Showing posts with label Universal Carrier. Show all posts

Friday, April 12, 2013

T16s Painted At Last!

After much toil and work, my T16s are finally ready to grace the table! Be forewarned, this post has lots of large images!
All the vehicles have been painted very similarly to my Shermans: Russian Uniform Green paint, overwashed a few times with Agrax Earthshade, with drybrush highlights of the base with a bit of pale sand mixed in. The tracks are Gunmetal Grey mixed with a bit of matte black, the tires are a mix of matte black and Panzer Uniform Black from Vallejo's Tank Aces line. Netting and most of the stowage is a mix of colours I couldn't even remember now, but involves a leather colour, some green, and some pale sand, to make a unique hybridized colour very similar to British tunic colour.
The order of battle markings show my company to be from the Algonquin Regiment of Canada, chosen because it's the closest one to where my family grew up. I had to paint all the 62s by hand (and the green squares) though the Canadian 4th are decals.
The front of each of the T16s has a different specific stowage layout, but all have the extra wheel mounted, which matches the ones on the vehicles themselves.
The interior of the T16s are likewise varied in stowage, one having an extra wheel from the deployed 6pdrs thanks to Tom Stanley's figure standing on one himself.
The sides of each vehicle have a serial number, which is random except for the first two digits, which seem to have been relatively consistent. The rivets were added with liquid greenstuff which, while it's not exactly the greatest for gap filling, makes a fabulous surface additive for subtle detailing. This kind of depth was achieved with only two layers of green stuff, then some careful highlighting to make sure they didn't get lost.
All the guns are magnetized in place by a magnet buried in the vehicle, and a chunk of paperclip in the gun trails. They aren't strongly secured, and will separate on rough surfaces, but it does help reduce the unruliness of the two.


The interior of each vehicle was also intentionally made to be different where I could manage it. Each has the gas tank in what seems to have been the most common place, and has the radio in an appropriate place, but beyond that, I varied up the location of stowage and extra 6pdr shells, as well as doing what I could to throw in different figures for crew. In two cases, commanders from the Shermans from Open Fire became crewmen.
Something else that delayed my finishing of the T16s was that I painted the deployed guns at the same time, to ensure consistency where possible between them. I am at the stage of basing the guns, which I am trying to putty to look like they are in a city, and then this entire platoon will be finished and ready for the table!

Friday, March 08, 2013

T16s nearly done!

So I have finally managed to cast, and glue in, the remaining T16 crew! With them came a huge bunch of stowage, enough that I feel any more would hinder its combat role. I have (since these photos, black-sprayed them, and given the initial airbrush of green.
 
Here they are, all lined up and ready to go! The metal 'guards heads' from BF were incredibly useful for the casting, and to the right is the command UC that comes with the box set of 6pdrs. In a couple places, just to add variety, I have inserted British tank commanders from the Open Fire set. I can also say with hindsight, having basecoated them, that the rivets work! Liquid green stuff, with one or occasionally two coats to thicken it up, will indeed look like rivets if applied carefully! Much less work than trying to cut plasticard or paperclip to length and filing it back!

The other rivet counting thing I did was add the metal frame protector for the front left headlight. I had some spare PE metal sprues laying around, and carefully cut and bent them to length. Though they were easily the finickiest things I had to add to this project, the effect is, I think, quite strong!


In similar news, I have decided that rather than turning the remaining three otherwise unused Shermans from Open Fire into wrecks, I will convert them to Fireflies. Canadians in late-late war get to bump Sherman troops up to two Fireflies each, and this will give me a low-cost way of doing just that!
This project has certainly been more straightforward, but I think I'm less impressed with the outcome:
First, the tanks were assembled save the gun barrel, and the mount for the hull MG was shaved down. Next, I cut lengths of plastic rod to roughly the right length. The gun mantle was cut to accept the new barrel size, and stowage was prepped to cover the hole on the hull.
Next, copious amounts of putty were added to the ends of the barrels, so that I could shave them away for the muzzle brake. The turrets were then modified to have the second escape hatch, and since these photos, I have cut back the muzzle brakes, sloped the base of the gun barrel appropriately, and added a PE metal piece 'hatch hinge' on each. I've also added the externalized radio, and two storage bins to the backs of the turret. I'll put more photos up when they get further along, but as you can imagine, the next little while will be devoted to painting T16s!

Thursday, January 17, 2013

T16 update photos

I know there's been a delay, but I've been doing a lot of minor things on various projects of late. I have half-painted US Paras, a half-painted High Elf Mage, half-painted High Elf horsemen, and a now-basecoated Ork Bomma. Also, this!


I have applied the camo nets, and started adding crew. I'd cast enough for all but one carrier, but I wanted to get them in so I can start adding stowage. In two cases, I've taken slight liberties with uniforms to add a radio man from a tank commander and another with a pair of binoculars and awesome mustache. Also you can see in the pictures, I've started adding more front-deck stowage in the form of two flimsies, as well as tail lights and racked guns. The guns are pretty crude, but they'll be covered with crew forearms and stowage in most cases, so I'm not too concerned.

The other thing that's been eating up my time lately is this!

I'm currently making moulds of a final truck cabin, another truck body, and all the stowage I could amass from the Open Fire kit, to really pile the stowage on the T16s and the tanks.

Thursday, January 03, 2013

6pdrs Limbered to T16s at last!

I have gotten a bunch of work done on the T16s, and photographed them!

 Here's the back plates cut to size, and the backs of the T16s edged to put them in place. I have seen restored T16s without the back plate, but I think it's an omission rather than something actually done at the time.

After the lower plates were glued in, I then drilled out a slot for the magnets. These are my big (for models) 1/8th inch cylinders. They're good and strong, and actually let me get away with using just paperclip to hold the guns in place! This is much easier than trying to drill out a hole for a magnet on a pair of recoil struts.

Speaking of the guns:
Here's what they look like attached to the base, but separate from the T16s. The back end of the T16 would be more detailed if they were ever on the field without their guns. The paperclip is buried between the rails and up against the scoops, which are just thin bits of leftover plasticard. You can also see in this the travel bag that went over the muzzle. The wheels in this picture are the earlier ones I cut; as soon as I saw the way they looked, I switched to cutting them much closer together, so the notches look more like a field tyre than an off-road jeep.

Here's what the gun looks like attached to the T16. You can see that with it attached, it'd be nearly impossible to tell if there was indeed a trailer hitch or not, and in fact adding one would probably make the magnets not stick properly. As it is, lightly dragging the T16 forward brings the gun along with, which is exactly the strength I want: Strong enough to stay together, loose enough to separate for ease of travel and tight corners.

On this one you can see the tighter cut wheels (in the back left, for example) and all 6 in place! Behind them are models from the Open Fire set, some Oiran, and some High Elves. (because one project at a time is for the weak!) Now I just need to add camo netting to the guns for them to be done, and for the carriers: it's rifles; clutter stowage (including ammo); crew; small bits of oddity; painting; more oddity (I'm hoping to do pinup pics in one or two) and done! (Well, then I paint the actual platoon of 6pdrs...)

Tuesday, January 01, 2013

PIAT Organ

A short post today because I have been busy the whole time.

A while back I came across images of a Canadian Universal Carrier modification that had 14 PIAT launchers tied to the back as some wild destructive madman's dream. I knew I had to depict one of these in my force, even if only one of these vehicles historically existed.


This was a fun little simple build, which has been set aside for painting, lower on the totem pole than my other projects (and once I can get more of the patrols I will eventually be fielding).


As near as I can tell, this would be loaded, rushed at an enemy tank, (or more hopefully, snuck into position?) before a sharp tug yanked a bar that launched all the tubes simultaneously. The notion of being in the vehicle with 14 PIAT rounds bouncing around in the back, and another couple dozen or so slotted into their cardboard carry tubes around your vehicle is not for me, but awesome to depict!


My other two patrols will have more standard PIAT launchers equipped on their UCs, but once I saw this, I had to have one...

Saturday, December 29, 2012

The T16 Build

Since it's the project that prompted my getting a blog at long last, I figured I'd document the process up until this point.

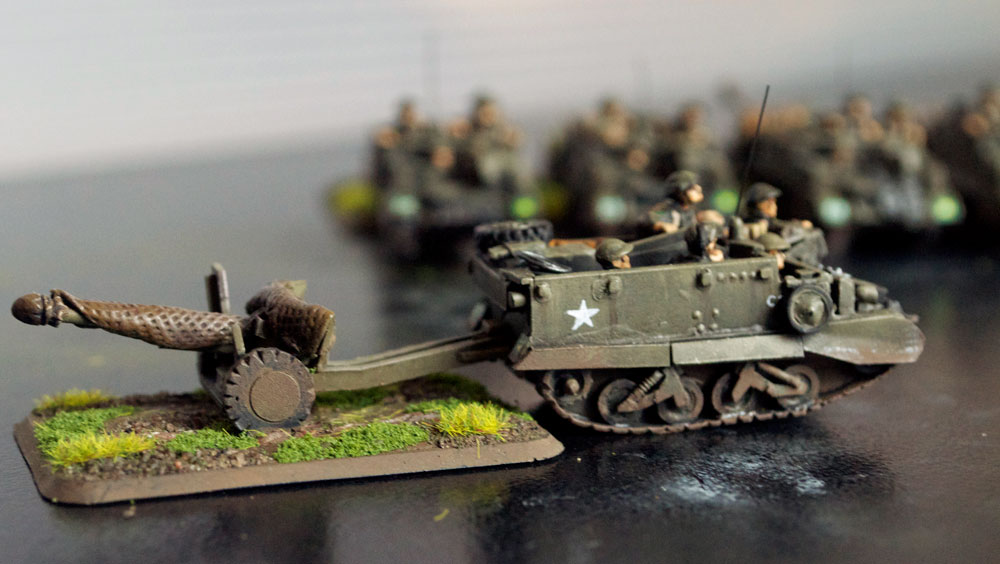
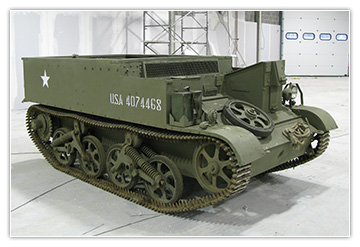
It all started when I was researching a possible Canadian Infantry company for Flames of War. I discovered during this that in WWII, the Canadians did not use the Loyd Carrier, as the British did, but instead used a vehicle developed by the United States, but not adopted by them. It looks like a stretched Universal Carrier, but is distinctive for being about 30cm longer, and having a different suspension layout.
No one makes a T16 in 1:100 scale, or even close, so it was up to me to craft it on my own.
I did my usual due diligence in researching, and compiled as many drawings and photos as I could lay hands on. Initially, I was going to build one, and cast it to make the rest, but I realized that with how thin the walls of a T16 are, one-piece moulding would result in too many bubbles. I crafted an initial prototype to get measurements right, and correct what might've been wrong, and the end result was this:

http://www.flickr.com/photos/41832634@N03/8248376599/in/photostream

From there, I revised the measurements that didn't work, and got to building:

Here, the lower hull is assembled, as well as the upper hull being framed in.

Here, the upper hull has had its engine filled in, and the front armour is starting to be put in place.

On this one, you can see the bent part of the front panel is done, and cut at the right angle. (I glue it on as a full box, to make sure I can cut to measure.) Next, I've started to work on the tracks, with the loose shape filled by the blank template wheels.

Here, the tracks have been laid out. You can see my measurement of the overall length of the strips that become the track lengths. This gives enough space to add gravity dip along the top up to quite a significant droop.

Next, I drilled holes into the wheels for both types of roadwheel, and cut pieces for suspension. The 'springs' are made from paperclip which has been grooved by pliers. You can see the track in the back has a significant sag.

Upper hulls glued to lower hulls, with the test track now filled with crew. I'm casting the bodies, and then replacing the heads (that tend to miscast) with ones ordered from Battlefront.

Here, the front track guards have been glued in place, the front has been sloped appropriately, and I've started to add the vision ports. You can also see in this one the engine deck has been textured to get its grill.

The front panels then were cut to be properly smooth, the horizontal rails glued on, and the default extra wheel glued in place. At this point I've also put another extra roadwheel on one or two, as well as the canvas hooks along the upper hull. Finally, because it was bothering me (rivet counter and all), I'd gone back and cut slots in the bulkhead behind the driver to add the engine intakes, then covered them appropriately. It looks a lot better, and adds detail to what would otherwise be flat space.

As a final T16 update, here is the current status of my vehicles. The rear exhausts are in, as well as their cover; the tow hooks have been added to the front; the extra roadwheels have their putty applied; the radios installed, in the front-right of the passenger compartment; the radio antenna's base, and what I believe must be its fold-down protector, are glued in place; and my 6pdrs have arrived! I'll make them a second post though... This one's already quite long.