Sunday, February 23, 2014

A 'New' Malifaux Deck

With my Panthers put away, and my Hired Swords and final Ten Thunders models up on the painting desk and being steadily layered, I've also been turning my attention to another project.

I am, by training, a graphic designer. I am also a card player, mostly euchre but so many more besides. One of the big draws to Malifaux for me was always the curious card system rather than dice. When I saw the default fate deck, I was unimpressed. I immediately thought about making a deck attempting to integrate the symbols; I've had thoughts of messing around with the distinctive look and feel of cards before, and here was a reason! Then, as I circled ever closer to purchasing and playing Malifaux, I discovered a thread regarding the forum-spawned old school deck, and knew I had to get one.

When I got it, for all the awesome it has, there was an issue: The cards are plastic. Not plastic-coated paper, like most you'll see, but fully plastic. If you are a card player, you know that they are just not up to snuff for most games. They slide wrong, they're thicker, they don't quite shuffle right, etc.

Other than that, beautiful deck. Wonderfully integrated symbols, a nice old-school touch, and very much a feel of a deck that returning colonists discovered in the parlours of Malifaux from the first excursion: Still playable, but warped, aged, and a little off.

So I got to thinking: I'd wanted to design a deck, and here was a reason. I wanted a different feel though: The old-deck (If someone can remember who made it, I'd love to know) looks just that: Very vintage. That kind of ink crazing happens after a long time, and the cards are well beaten up. I wanted to do a deck which is designed in the style you could theoretically walk into a store Earth-side or in Malifaux 'today' and buy.
First, knowing the era Malifaux takes place in, I wanted to add the arabesques that were so popular of the time, so I worked out a simple little swirl pattern. The faces currently are default from the internet, and while I may mildly change them, for the most part I don't want to theme them after the four main factions; this is meant to be a deck produced by a contemporary print shop, and I can not imagine them intentionally crafting cards themed after the vile Resurrectionists!

Considering the effects of the jokers, I made the black joker a grim reaper, (much like Xander's Retro deck: See the original here.) but wanted to make it feel even more like a 'real' deck, and so kept the art pattern simple, and then copied the pose for the red joker: A true jester, but still morbid: Skull wand, creepy expression, etc.

The four symbols, while heavily inspired by the old-deck, were done without any direct reference. I wanted them to be unique, and to answer the challenges my own way. I insisted that the shapes be as analogous as possible, which forced some odd bends to the crows, and necessitated the tassels for the masks. Since the 'heart' suit is now "Rams", each symbol is two ram skulls aligned as though butting against one another.

Similarly, the numbers were inspired by typefaces popular at the time, with the J(11), Q(12) and K(13) coming first, and then informing the Ace(1) and other numbers thematically.

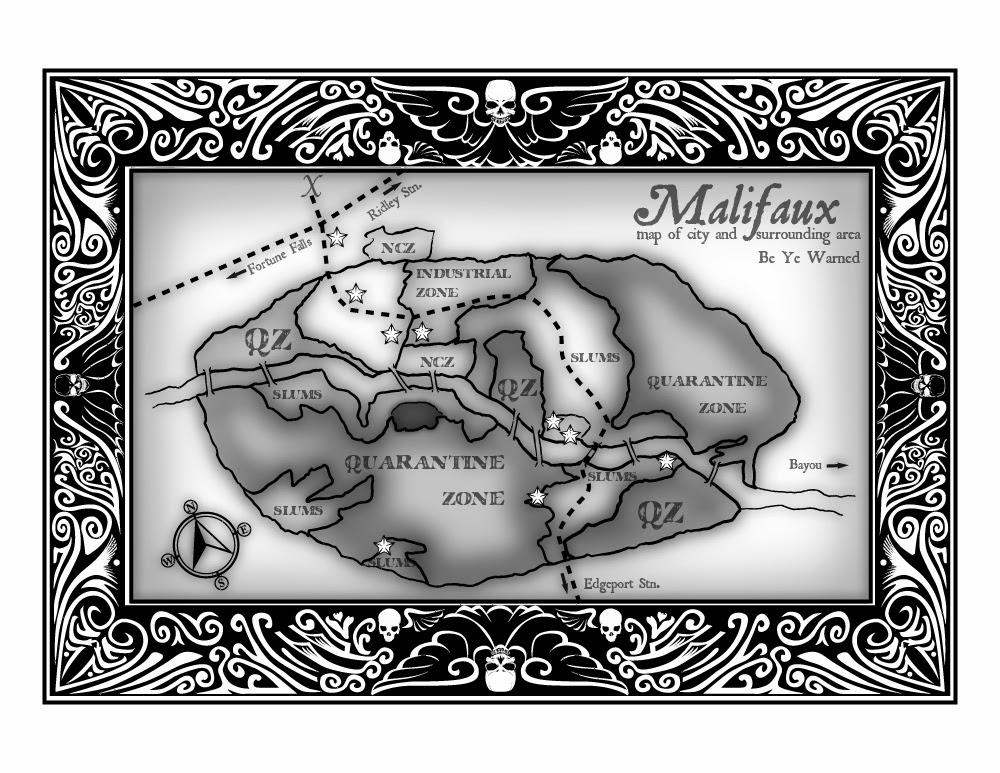
I struggled for a while with the back design. Card design over the centuries has seen simple patterns, photographs, or often just blank backsides, but I wanted to go more the bicycle route. Initially I tried integrating the steampunk feel but it just felt too forced. Eventually I settled on what I figure any visitor to Malifaux would want on their handy, ever-accessible deck of cards: A map of Malifaux's regions.

This, then, serves as a way to advertise the capabilities of the printing house's detail, makes for a useful tool for people who own the deck, and feels very card-like. After attempting various ways of fooling with digital arabesques, I finally just gave up, hand-drew all but the skulls, and then scanned and vectorized them.

Finally came the challenge of the spade ace. I knew I wanted to make the deck as like a real one as possible, and here the rivet-counting ways flared in. Through research, I discovered that the reason Aces of, specifically, Spades have such fancy designs has to do with tariffs once applied to things like decks of cards. Rather than having a slip of paper with every deck sold to prove its print house had paid its dues, card makers made the first visible card in the deck have it on it. This also served as part advertisement, and gradually evolved into the very fanciful ace we have today.

Well, with that knowledge, I couldn't have each suit with a fanciful Ace, as there'd be no historical bearing for it. Clubs (Tomes), Hearts (Rams), and Diamonds (Masks) were relegated to normal status,  but I had to do something fancy for Spades (Crows).

This is where I am at so far. (The grey is just template for the card border.) I've been pulling in various Ace design shapes, and pulling inspiration from the best elements of each. My ace works as "advertisement" for the print shop, and fancy design as it ought. The crow itself is reworked in its design, but is essentially still the same crow. I can't yet decide if I want to do more patterning through the center, and I am debating putting arabesques around the crow itself. (Input would be greatly appreciated.)

For final thoughts: I welcome any critiques, especially on the face cards, back of deck, and Ace of Spades. I'm mostly on the final cleanup now, and will likely also be getting a cream-coloured paper to photograph, and add as texture to the cards before sending them off to print. There's a company that offers to make decks and I am hoping the prints will work out. I'll test-run it first on a laser-printer, to make sure the detail is not too fine. If folks want a more detailed look at the various suit cards, I can add them in my next update when I can finish off the ace.

It's been a fun process; my Illustrator file is sprawling with layers to keep everything aligned properly!

Friday, February 14, 2014

Panther Company; Second Platoon

At long last, my computer behaves for enough consecutive minutes to let me finish up my photo editing! I am having quite a task making it behave, but sadly getting a new one requires funds I don't have at the moment...

Enough about that, let's talk about pretty models!

The 2nd Platoon is made up of late-model G panthers. They have the flame hoods, red oxide primer showing through, ambush camo, and lots of fun stowage. Here's the platoon leader:

As you may be able to recognize, the commander is the DAK radioman, with his webbing shaved off, and lower half delicately removed. Painted in black gear, the uniform is similar enough (at least the visible parts are), and it's certainly a 2iC worthy pose. I admit, once I saw him in the turret, I was very tempted to make him the CO, but I quite like the idea in my forces that while the CO gestures and orders, it's the 2iC doing the work to make sure it gets done right.

This tank has quite a bit of unique stowage. the bedroll-on-tracks on the turret is from a photograph, and the ladder off the side is as well. I am not certain they rode into battle with said ladders in place, since it seems they could be used by daring enemies, but it makes for a more interesting model. This tank also has the universal bucket, and a spooled up towcable on the hoods, and, for the fun of it, a wash basin attached to the turret side. This too is from a photograph and I knew I had to carve one for my company!

Tank 422 also has a ladder on its rear, again based on a photo I saw. I like the idea that this one ends on the flame hood: Any soldier trying to use this ladder while the tank is running is going to get a face-full of exhaust, and possibly some 2nd degree burns to boot! Another boom-box arrangement of wheels, and a full turret's worth of spare tracks makes this tank well defended in the crew's mind. I have also added more of the rear deck stowage bins on this one.

Tank 423 has an interesting conversion I had to try. The minor details are, of course, numbers crudely painted over the tracks on the right side, and a towcable slung oddly down the right flank of the tank. Most notably (and fully visible in the rightmost inset image) is another relatively rare crew conversion.

As the allied airforce became more dangerous, strafing and bombing, the Panther crews (allegedly) found their engine decks exposed to a possible telling hit from the planes' .50cal MGs and bomb shrapnel falling among the cooling fans, messing up the engine. To combat this, they cut up sections of Schurtzen, and welded them in place as a kind of covering, hinged in the case of the main fans, to help keep them clear.

They also would cut up and weld together plates to go on the top of the turret, to add extra protection from these attacks for the crew. It's not really something that would have provided much benefit, but it is a thing that looks fun to convert. (And, with all its difficulties, was quite fun!) I'm sure you can see now why so few of my tanks have Schurtzen anymore! The metal plates were far thinner than any material it was worth using on these, so rather than trying to suffer the degradation of paper or tinfoil, I just carefully beveled the edges of the thinnest plasticard I have, so that when painted, the light and highlight methods would help reinforce just how thin these plates were.

As with most of the rarer field conversions, there is but one tank in my entire company thus converted, as a way of saying "this did happen, at least once". Stowage-wise, I also have wooden beams for assistance unbogging the tanks in muddy going.

The final tank of the force, so far, is what I like to call the Cook's Vehicle. I know each tank crew was responsible for cooking their meals for the tank, but I like the idea of a panzer brigade's fast movement and tight knit group style having the entire company eating together where possible. To this end, the crew has attached a cooking pot and pan to the side of the turret. This tank also has a camo net (tinfoil) strung over a large oil drum (plasticard with liquid greenstuff ridges), some jerry cans, a spare wheel, and more wooden beams for unbogging. The left side of the turret is as much as I can manage a recreation of a specific tank, with the combination of stowage and beat up spare tracks.

And that's the company! I still have a bergepanther and a nachtjager panther that just today got spraypainted, and once I've amassed enough models to make an airbrushing worth it, they too shall join the ranks of the company, allowing me to relegate Barkmann to his proper hero status. In the meantime, I am eagerly painting a Viktorias crew for Malifaux as I finish up final kimono details on Misaki, Ototo, and Yamaziko. I am so eager to try that game!

Monday, February 10, 2014

Panther Company; First Platoon

I return with more edited photos!

First platoon is equipped with early-model Panther G tanks. As such, they don't have the chin armour, have zimmerit paste, and have their back ends modified with the Panther D nozzles, with armour plating.

Panther Tank 411 is the platoon leader. His tank has a traditional style of camo patterning, and has been renumbered from a previous assignment. (As was often done, it was painted over with dunkelgelb, and new numbers applied, leaving the old numbers barely visible through.)

Custom gear on this tank includes the looped up tow cable, a rifle over the tools, extra stowage again cast from other PSC or BF parts, and another custom ammo crate. The oft-converted stowage for extra jerry cans (on either sides of the exhaust) is visible here too.

If you click on the image to get a bigger view, you can see how the zimmerit paste technique has worked, and with careful drybrushing it actually looks quite convincing. You can see again on this one how the mud mix applied to the lower quarter of the tank makes it looks like it's seen some things, and I personally love how the tow hooks look painted. It's such a minor detail, but sells the scale.

Tank 412 is a fairly standard build. Ubiquitous bucket added to the back, towcable strung across from the front towhook to the back of the tank, ammo crate and spare wheel/gear.. As you can see on this one, the tracks mounted to the tank side were applied after the hull got its camo (in fluff; obviously it was glued to the model pre-paint).

Also clear on this one: Using the PSC D-mantlet unmodified is slightly wrong, because they have the binoc gun sight, as opposed to the monoc later one. I had covered the hole with liquid greenstuff before adding the zimmerit paste, and am happy to say the hole isn't visible at all.

Tank 413 is sadly missing a side: The photo was blurry and to be honest the image is pretty standard. This is what I jokingly refer to as my "boombox" or "Mickey Mouse" tank, because of the twin roadwheels. Every photo I saw with two on the turret thus made me think of either massive speakers or the aforementioned mouse. This tank also has the rear deck stowage bins, which were cobbled together out of spare bits of schurtzen. Tank 413 also has its side-turret numbers painted on the tracks, which was a relatively common practice once the tracks themselves became ubiquitous.

The final tank for this platoon is, obviously, 414. Another relatively straightforward build, but one of the spare cut-off tank jacks was thrown on the back as extra stowage. I have also puttied a camouflage tarp such that it's attached to the gun cleaning rod case, which I've seen once or twice. Sadly, whichever crewman owns the helmet on the back-left of the tank will be unhappy when he next looks at it: It's taken a shell hit at some point (a resin bubble I decided not to fill) and won't be much use!

With that, First Platoon is done. I do have Schurtzen painted up for them, and may put them on, if I prefer the way they look with. I also am debating adding foliage, but I do kind of like the look of them pure. I'll dry run a few, and dig back through my photosets to see what was most common. Any thoughts from you folks as to with or without foliage?

2nd Platoon will be up when I can get their photos edited, which will hopefully be by Thursday. enjoy!

Thursday, February 06, 2014

Panther Company Done at Last!

It is finished! I finally have the tanks at a state where I am not frustrated with their look! (As always, there's something to tinker with forever...)

There's enough photos, and they're taking long enough to edit, that rather than doing one post I'll split it up roughly by company. To start with, a group photo!


Astute eyes may notice a plethora of different paint schemes. I decided that, since these are likely the only 10-or-so Panthers I'll paint, I would have fun and try all sorts of different ones, minus the few truly bizarre, single-battle schemes. I did roughly split the scheme by platoon, however, helping to identify which tanks belong to which platoon.

I am a huge fan of the late-war ambush camo scheme, so the late-model Panther G platoon got that as their mock-up. The slightly-older Panther G variant gets a more standard brown/green/gelb, but one has the more snake-line pattern, while the others have a more blob-like appearance.

And now, for the by-model breakdown. First up for your viewing pleasure, the 2iC, Barkmann!

I left Barkmann's model mostly alone, conversion-wise. The schürtzen, being the easily-warped pewter version, got a bit of worrying, as well as the two mudguards at the front. Other than that, I added an extra wheel on the turret rear, a custom ammo crate, and bedroll. The most frustrating part of this tank is that rear hatch crewman. He's not especially difficult to paint, but God is he easy to overlook!

Even though he breaks the standard number scheme of my company, I kept Barkmann to his historical tank's number of 424. Eventually I will replace him with my nachtjager panther, and would then want to be able to play him as his special character self.

Following swiftly on the treads of Barkmann, my company CO:

My tank commander is meant to double as a possible panzer ace, and as such I gave his tank a bit of extra loving. He's got a modified location for the barrel cleaning rods (a rare, in-the-field upgrade), a bucket in the 'standard' position hanging off the back middle, extra fuel cans, flame hoods, an mg34 on the turret for his personal use, and, on the hopefully rare occasion he is forced to disembark, a 'borrowed' panzerschreck to claim vengeance!

Now with it painted, you can see my liquid greenstuff zimmerit works fairly well. I try for a realistic paintscheme, so I haven't really accentuated the folds, but they are deep enough to catch washes, and sharp enough that drybrush highlights work quite well.

I have painted the tracks hung on the sides in two different ways. Often tanks would be hung as extra armour from the turrets, and then overpainted with the rest of the tank. For this purpose, the camo patterns and tank number (401) are on the tracks, but they've been hit with a 'rust wash' as well to show the lack of priming done for them.

The command figure in the turret is from the Kfz. 251 crew kit purchased from Battlefront. I carefully removed the legs, shaved him to fit, and knew at once I had a good strong commanding figure. Other stowage is either custom-made (the crates), or is from the PSC 251 kit, cast and used. Helmets are painted in late-war Heer splinter camo net style, or left as their standard panzer grey. Here you can also see how the mud mix was applied to the tracks to hide mould lines, and on the lower rear of the panzer itself, from splatter.

If you have any questions regarding particular elements of the conversion (or painting) don't hesitate to ask! I'll hopefully have the rest of the company up, as soon as I can edit and upload the photos.

It's finally done! It feels so good to have them off my desk.