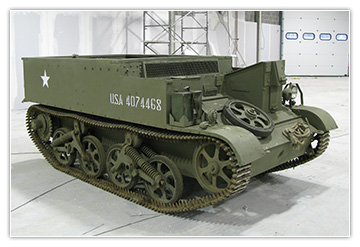
It all started when I was researching a possible Canadian Infantry company for Flames of War. I discovered during this that in WWII, the Canadians did not use the Loyd Carrier, as the British did, but instead used a vehicle developed by the United States, but not adopted by them. It looks like a stretched Universal Carrier, but is distinctive for being about 30cm longer, and having a different suspension layout.
No one makes a T16 in 1:100 scale, or even close, so it was up to me to craft it on my own.
I did my usual due diligence in researching, and compiled as many drawings and photos as I could lay hands on. Initially, I was going to build one, and cast it to make the rest, but I realized that with how thin the walls of a T16 are, one-piece moulding would result in too many bubbles. I crafted an initial prototype to get measurements right, and correct what might've been wrong, and the end result was this:
http://www.flickr.com/photos/41832634@N03/8248376599/in/photostream
From there, I revised the measurements that didn't work, and got to building:
Here, the lower hull is assembled, as well as the upper hull being framed in.
Here, the upper hull has had its engine filled in, and the front armour is starting to be put in place.
On this one, you can see the bent part of the front panel is done, and cut at the right angle. (I glue it on as a full box, to make sure I can cut to measure.) Next, I've started to work on the tracks, with the loose shape filled by the blank template wheels.
Here, the tracks have been laid out. You can see my measurement of the overall length of the strips that become the track lengths. This gives enough space to add gravity dip along the top up to quite a significant droop.
Next, I drilled holes into the wheels for both types of roadwheel, and cut pieces for suspension. The 'springs' are made from paperclip which has been grooved by pliers. You can see the track in the back has a significant sag.
Upper hulls glued to lower hulls, with the test track now filled with crew. I'm casting the bodies, and then replacing the heads (that tend to miscast) with ones ordered from Battlefront.
Here, the front track guards have been glued in place, the front has been sloped appropriately, and I've started to add the vision ports. You can also see in this one the engine deck has been textured to get its grill.
The front panels then were cut to be properly smooth, the horizontal rails glued on, and the default extra wheel glued in place. At this point I've also put another extra roadwheel on one or two, as well as the canvas hooks along the upper hull. Finally, because it was bothering me (rivet counter and all), I'd gone back and cut slots in the bulkhead behind the driver to add the engine intakes, then covered them appropriately. It looks a lot better, and adds detail to what would otherwise be flat space.


No comments:
Post a Comment