Monday, December 31, 2012

Kfz. 70 conversion

The 6pdr project is going steadily, but nothing yet really worthy of photographing. Because of that, I'll show some of my previous work!

First, the Kfz. 70s. I've bought a Motorized Rifle Company for blitzkrieg, and have been slowly painting it amongst my other projects. The problem with the BF transports is they only give one block of ranked up, sitting infantry for each truck! This means one either has all their trucks half full, or half of them full, the other half empty. Considering trucks are now only on the field if they're filled with guys, this seems somewhat silly, and unfortunate.

So once again, I decided to go overboard to make all the vehicles appear full. I determined to make half have covered roofs, and the other half open-topped and loaded with soldiers.

The first step was to clean-cut the folded down windscreen, and take off the collected bars at the front of the passenger compartment. Once this was done, many holes were drilled, and three or four paperclips became good sturdy frames for the covers. I have previously used blister plastic to make windscreens, which is my intent again here. I decided, since I've not done this before, to test a variety of methods of making 'canvas' covers, namely: tissue paper, newsprint (with glue and water to adhere it), or plasticard (with putty details).


 I can now say with certainty that tissue paper is the best, if most finicky, newsprint-and-tissue is a decent mix for a more taut cover, and plasticard is just a nightmare. The card is too thick, too stubborn, and doesn't end up detailed enough.

 Here then, is the finished group of trucks. First the guys with their passengers all ranked up, with the markings on the front to distinguish platoons. With half having the width markings, and the other half branch of service, I'll be able to have half the vehicles in each platoon be covered and uncovered, without too much fuss trying to remember who is with whom.

Finally, here's the covered trucks painted up. You can see the front canopies applied, the same front fender markings, and the variety of materials. The two at the back are the tissue paper ones, front-left is tissue-and-newsprint, and front-right is the plasticard one, with putty added after to give it some texture. The bases are flocked with two separate types of grass, one very dark and almost like dander, for 'short grasses' or low bushes, and the other a lighter green static grass.There's surprisingly few markings, and no balkenkreuzes along the side, because none of the photo research I could find had any.

Soon, I pull out the pair of Kfz. 15s and paint them up, and then the transport section for my force will be finished!

Sunday, December 30, 2012

QF 6pdr in transport

Now for the other half of my creation. I am also scratch-building limbered 6pdr guns to magnetically attach to the back. This way, hopefully, I'll be able to fill the T16s with crew, and not have phantom 'surfing' crew out the back.

To that end, first I bought a box of 6pdrs. I found it rather funny how they were wrapped though:
For some reason, everything but the bases and the UC were in the smaller compartment, with all that space for one adorable little vehicle!

I assembled one 6pdr gun to use it for measuring, and then set to work on a flurry of cutting, bending, measuring some more, and pruning:
The top gun shield is what they look like when bent. Everything else is meant to either be part of the base, or part of the shield itself. (The 6pdr has two shields!)

This is the 'front' shield, starting to be assembled. The fiddly pieces on the left were the most annoying to cut so far, I think. Luckily, it's all on thin plasticard, so it's not terribly hard to cut through.

Here, I've added the closed gun trails, and the side-panels for the wheels to attach to. Above you can see the pre-cut lengths of doweling for the gun barrel and recoil dampener. At the top is also the first test of attaching the main gun shield.


Finally, here's all the gun shields attached, the barrels drying in the background, and the wheels (4.8mm rod thickened with greenstuff, then sliced like a salami to the proper 2mm width) ready to be grooved and assembled. Beside them is the BF 6pdr assembled, to make sure I'm doing everything properly.

Next steps are to magnetize the backs of the T16s, magnetize the rails of the 6pdrs, add the shovelplates to the rails, (glue the guns into the mounts) and putty on the canvas covers for 'travel mode'!

Saturday, December 29, 2012

The T16 Build

Since it's the project that prompted my getting a blog at long last, I figured I'd document the process up until this point.

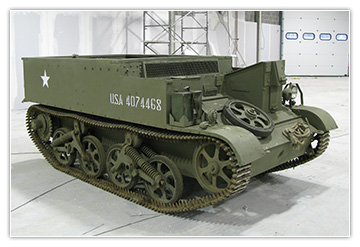
It all started when I was researching a possible Canadian Infantry company for Flames of War. I discovered during this that in WWII, the Canadians did not use the Loyd Carrier, as the British did, but instead used a vehicle developed by the United States, but not adopted by them. It looks like a stretched Universal Carrier, but is distinctive for being about 30cm longer, and having a different suspension layout.
No one makes a T16 in 1:100 scale, or even close, so it was up to me to craft it on my own.
I did my usual due diligence in researching, and compiled as many drawings and photos as I could lay hands on. Initially, I was going to build one, and cast it to make the rest, but I realized that with how thin the walls of a T16 are, one-piece moulding would result in too many bubbles. I crafted an initial prototype to get measurements right, and correct what might've been wrong, and the end result was this:

http://www.flickr.com/photos/41832634@N03/8248376599/in/photostream

From there, I revised the measurements that didn't work, and got to building:

Here, the lower hull is assembled, as well as the upper hull being framed in.

Here, the upper hull has had its engine filled in, and the front armour is starting to be put in place.

On this one, you can see the bent part of the front panel is done, and cut at the right angle. (I glue it on as a full box, to make sure I can cut to measure.) Next, I've started to work on the tracks, with the loose shape filled by the blank template wheels.

Here, the tracks have been laid out. You can see my measurement of the overall length of the strips that become the track lengths. This gives enough space to add gravity dip along the top up to quite a significant droop.

Next, I drilled holes into the wheels for both types of roadwheel, and cut pieces for suspension. The 'springs' are made from paperclip which has been grooved by pliers. You can see the track in the back has a significant sag.

Upper hulls glued to lower hulls, with the test track now filled with crew. I'm casting the bodies, and then replacing the heads (that tend to miscast) with ones ordered from Battlefront.

Here, the front track guards have been glued in place, the front has been sloped appropriately, and I've started to add the vision ports. You can also see in this one the engine deck has been textured to get its grill.

The front panels then were cut to be properly smooth, the horizontal rails glued on, and the default extra wheel glued in place. At this point I've also put another extra roadwheel on one or two, as well as the canvas hooks along the upper hull. Finally, because it was bothering me (rivet counter and all), I'd gone back and cut slots in the bulkhead behind the driver to add the engine intakes, then covered them appropriately. It looks a lot better, and adds detail to what would otherwise be flat space.

As a final T16 update, here is the current status of my vehicles. The rear exhausts are in, as well as their cover; the tow hooks have been added to the front; the extra roadwheels have their putty applied; the radios installed, in the front-right of the passenger compartment; the radio antenna's base, and what I believe must be its fold-down protector, are glued in place; and my 6pdrs have arrived! I'll make them a second post though... This one's already quite long.