I return with more edited photos!
First platoon is equipped with early-model Panther G tanks. As such, they don't have the chin armour, have zimmerit paste, and have their back ends modified with the Panther D nozzles, with armour plating.
Panther Tank 411 is the platoon leader. His tank has a traditional style of camo patterning, and has been renumbered from a previous assignment. (As was often done, it was painted over with dunkelgelb, and new numbers applied, leaving the old numbers barely visible through.)
Custom gear on this tank includes the looped up tow cable, a rifle over the tools, extra stowage again cast from other PSC or BF parts, and another custom ammo crate. The oft-converted stowage for extra jerry cans (on either sides of the exhaust) is visible here too.
If you click on the image to get a bigger view, you can see how the zimmerit paste technique has worked, and with careful drybrushing it actually looks quite convincing. You can see again on this one how the mud mix applied to the lower quarter of the tank makes it looks like it's seen some things, and I personally love how the tow hooks look painted. It's such a minor detail, but sells the scale.
Tank 412 is a fairly standard build. Ubiquitous bucket added to the back, towcable strung across from the front towhook to the back of the tank, ammo crate and spare wheel/gear.. As you can see on this one, the tracks mounted to the tank side were applied after the hull got its camo (in fluff; obviously it was glued to the model pre-paint).
Also clear on this one: Using the PSC D-mantlet unmodified is slightly wrong, because they have the binoc gun sight, as opposed to the monoc later one. I had covered the hole with liquid greenstuff before adding the zimmerit paste, and am happy to say the hole isn't visible at all.
Tank 413 is sadly missing a side: The photo was blurry and to be honest the image is pretty standard. This is what I jokingly refer to as my "boombox" or "Mickey Mouse" tank, because of the twin roadwheels. Every photo I saw with two on the turret thus made me think of either massive speakers or the aforementioned mouse. This tank also has the rear deck stowage bins, which were cobbled together out of spare bits of schurtzen. Tank 413 also has its side-turret numbers painted on the tracks, which was a relatively common practice once the tracks themselves became ubiquitous.
The final tank for this platoon is, obviously, 414. Another relatively straightforward build, but one of the spare cut-off tank jacks was thrown on the back as extra stowage. I have also puttied a camouflage tarp such that it's attached to the gun cleaning rod case, which I've seen once or twice. Sadly, whichever crewman owns the helmet on the back-left of the tank will be unhappy when he next looks at it: It's taken a shell hit at some point (a resin bubble I decided not to fill) and won't be much use!
With that, First Platoon is done. I do have Schurtzen painted up for them, and may put them on, if I prefer the way they look with. I also am debating adding foliage, but I do kind of like the look of them pure. I'll dry run a few, and dig back through my photosets to see what was most common. Any thoughts from you folks as to with or without foliage?
2nd Platoon will be up when I can get their photos edited, which will hopefully be by Thursday. enjoy!
Showing posts with label Zimmerit. Show all posts
Monday, February 10, 2014
Panther Company; First Platoon
Labels:
conversion,
Flames of War,
German army,
Panther,
Panther G,
Plastic Soldier Company,
PSC,
WW2,
WWII,
Zimmerit
Thursday, February 06, 2014
Panther Company Done at Last!
It is finished! I finally have the tanks at a state where I am not frustrated with their look! (As always, there's something to tinker with forever...)
There's enough photos, and they're taking long enough to edit, that rather than doing one post I'll split it up roughly by company. To start with, a group photo!
Astute eyes may notice a plethora of different paint schemes. I decided that, since these are likely the only 10-or-so Panthers I'll paint, I would have fun and try all sorts of different ones, minus the few truly bizarre, single-battle schemes. I did roughly split the scheme by platoon, however, helping to identify which tanks belong to which platoon.
I am a huge fan of the late-war ambush camo scheme, so the late-model Panther G platoon got that as their mock-up. The slightly-older Panther G variant gets a more standard brown/green/gelb, but one has the more snake-line pattern, while the others have a more blob-like appearance.
And now, for the by-model breakdown. First up for your viewing pleasure, the 2iC, Barkmann!
I left Barkmann's model mostly alone, conversion-wise. The schürtzen, being the easily-warped pewter version, got a bit of worrying, as well as the two mudguards at the front. Other than that, I added an extra wheel on the turret rear, a custom ammo crate, and bedroll. The most frustrating part of this tank is that rear hatch crewman. He's not especially difficult to paint, but God is he easy to overlook!
Even though he breaks the standard number scheme of my company, I kept Barkmann to his historical tank's number of 424. Eventually I will replace him with my nachtjager panther, and would then want to be able to play him as his special character self.
Following swiftly on the treads of Barkmann, my company CO:
My tank commander is meant to double as a possible panzer ace, and as such I gave his tank a bit of extra loving. He's got a modified location for the barrel cleaning rods (a rare, in-the-field upgrade), a bucket in the 'standard' position hanging off the back middle, extra fuel cans, flame hoods, an mg34 on the turret for his personal use, and, on the hopefully rare occasion he is forced to disembark, a 'borrowed' panzerschreck to claim vengeance!
Now with it painted, you can see my liquid greenstuff zimmerit works fairly well. I try for a realistic paintscheme, so I haven't really accentuated the folds, but they are deep enough to catch washes, and sharp enough that drybrush highlights work quite well.
I have painted the tracks hung on the sides in two different ways. Often tanks would be hung as extra armour from the turrets, and then overpainted with the rest of the tank. For this purpose, the camo patterns and tank number (401) are on the tracks, but they've been hit with a 'rust wash' as well to show the lack of priming done for them.
The command figure in the turret is from the Kfz. 251 crew kit purchased from Battlefront. I carefully removed the legs, shaved him to fit, and knew at once I had a good strong commanding figure. Other stowage is either custom-made (the crates), or is from the PSC 251 kit, cast and used. Helmets are painted in late-war Heer splinter camo net style, or left as their standard panzer grey. Here you can also see how the mud mix was applied to the tracks to hide mould lines, and on the lower rear of the panzer itself, from splatter.
If you have any questions regarding particular elements of the conversion (or painting) don't hesitate to ask! I'll hopefully have the rest of the company up, as soon as I can edit and upload the photos.
It's finally done! It feels so good to have them off my desk.
There's enough photos, and they're taking long enough to edit, that rather than doing one post I'll split it up roughly by company. To start with, a group photo!
Astute eyes may notice a plethora of different paint schemes. I decided that, since these are likely the only 10-or-so Panthers I'll paint, I would have fun and try all sorts of different ones, minus the few truly bizarre, single-battle schemes. I did roughly split the scheme by platoon, however, helping to identify which tanks belong to which platoon.
I am a huge fan of the late-war ambush camo scheme, so the late-model Panther G platoon got that as their mock-up. The slightly-older Panther G variant gets a more standard brown/green/gelb, but one has the more snake-line pattern, while the others have a more blob-like appearance.
And now, for the by-model breakdown. First up for your viewing pleasure, the 2iC, Barkmann!
I left Barkmann's model mostly alone, conversion-wise. The schürtzen, being the easily-warped pewter version, got a bit of worrying, as well as the two mudguards at the front. Other than that, I added an extra wheel on the turret rear, a custom ammo crate, and bedroll. The most frustrating part of this tank is that rear hatch crewman. He's not especially difficult to paint, but God is he easy to overlook!
Even though he breaks the standard number scheme of my company, I kept Barkmann to his historical tank's number of 424. Eventually I will replace him with my nachtjager panther, and would then want to be able to play him as his special character self.
Following swiftly on the treads of Barkmann, my company CO:
My tank commander is meant to double as a possible panzer ace, and as such I gave his tank a bit of extra loving. He's got a modified location for the barrel cleaning rods (a rare, in-the-field upgrade), a bucket in the 'standard' position hanging off the back middle, extra fuel cans, flame hoods, an mg34 on the turret for his personal use, and, on the hopefully rare occasion he is forced to disembark, a 'borrowed' panzerschreck to claim vengeance!
Now with it painted, you can see my liquid greenstuff zimmerit works fairly well. I try for a realistic paintscheme, so I haven't really accentuated the folds, but they are deep enough to catch washes, and sharp enough that drybrush highlights work quite well.
I have painted the tracks hung on the sides in two different ways. Often tanks would be hung as extra armour from the turrets, and then overpainted with the rest of the tank. For this purpose, the camo patterns and tank number (401) are on the tracks, but they've been hit with a 'rust wash' as well to show the lack of priming done for them.
The command figure in the turret is from the Kfz. 251 crew kit purchased from Battlefront. I carefully removed the legs, shaved him to fit, and knew at once I had a good strong commanding figure. Other stowage is either custom-made (the crates), or is from the PSC 251 kit, cast and used. Helmets are painted in late-war Heer splinter camo net style, or left as their standard panzer grey. Here you can also see how the mud mix was applied to the tracks to hide mould lines, and on the lower rear of the panzer itself, from splatter.
If you have any questions regarding particular elements of the conversion (or painting) don't hesitate to ask! I'll hopefully have the rest of the company up, as soon as I can edit and upload the photos.
It's finally done! It feels so good to have them off my desk.
Labels:
conversion,
Flames of War,
German army,
Panther,
Panther G,
Plastic Soldier Company,
WW2,
WWII,
Zimmerit
Friday, November 29, 2013
Big Cats On The Block
It's time for a halfway update on Panthers! I had airbrushed them, and was not 100% on how they're painted. I put them aside to paint the Malifaux crew, but was motivated to give a second look by a friendly reminder on WWPD. I have pulled them back out, and am working to get them finished:
As you can see, I've done one zug with the earlier three-colour painting, (the platoon with zimmerit) and a second platoon with the later scheme where they just saved on dunkelgelb by leaving the oxide undercoat showing instead of brown. Annoyingly, my green and brown didn't entirely come out clean-edged, and I may yet go back and touch them up with my dunkelgelb colour by airbrush.
One thing that did help is a thinned coating of Agrax Earthshade mixed with water. It helps to add definition to the plates and cracks, and dulls the green and brown more realistically. In this lighting, it looks like it darkens the dunkelgelb too much, but it doesn't seem that off in person. We shall see.
By now, you can also see the effects of the zimmerit paste to some extent. It is a subtle, perhaps more realistic (than stylistic) effect on the armour.
Also currently on the table are my remaining Ten Thunders models. I'll be trying a source lighting effect on Yamaziko, Misaki will have gold traced patterns on her garb, and Ototo... I will figure something out for. I've made Shang about as bright as I can possibly go without him looking like popcorn, as befits a creature of fire!
And finally, my lady-swords faction for Malifaux: As you can see, they are not consistently painted but have echoing motifs across the entire group, I paint the base colours this way to help make sure I'm getting some of the same colour on different models in the crew, before they get the paint bottle treatment you can see with the heads of the Ten Thunders above, when I'm down to final details.
Since these photos were taken, I've been painting the tools and stowage on the Panthers, and will probably end up doing a post on how I paint the tracks. I've also gone back to attempting to make my final two Panther vehicles: A Bergepanther and a Nachtsichtgeraten Panther (night fighter). Once the table is clear of that stuff, well... Then I start to dig into the pile...
As you can see, I've done one zug with the earlier three-colour painting, (the platoon with zimmerit) and a second platoon with the later scheme where they just saved on dunkelgelb by leaving the oxide undercoat showing instead of brown. Annoyingly, my green and brown didn't entirely come out clean-edged, and I may yet go back and touch them up with my dunkelgelb colour by airbrush.
One thing that did help is a thinned coating of Agrax Earthshade mixed with water. It helps to add definition to the plates and cracks, and dulls the green and brown more realistically. In this lighting, it looks like it darkens the dunkelgelb too much, but it doesn't seem that off in person. We shall see.
By now, you can also see the effects of the zimmerit paste to some extent. It is a subtle, perhaps more realistic (than stylistic) effect on the armour.
Also currently on the table are my remaining Ten Thunders models. I'll be trying a source lighting effect on Yamaziko, Misaki will have gold traced patterns on her garb, and Ototo... I will figure something out for. I've made Shang about as bright as I can possibly go without him looking like popcorn, as befits a creature of fire!
And finally, my lady-swords faction for Malifaux: As you can see, they are not consistently painted but have echoing motifs across the entire group, I paint the base colours this way to help make sure I'm getting some of the same colour on different models in the crew, before they get the paint bottle treatment you can see with the heads of the Ten Thunders above, when I'm down to final details.
Since these photos were taken, I've been painting the tools and stowage on the Panthers, and will probably end up doing a post on how I paint the tracks. I've also gone back to attempting to make my final two Panther vehicles: A Bergepanther and a Nachtsichtgeraten Panther (night fighter). Once the table is clear of that stuff, well... Then I start to dig into the pile...
Friday, May 10, 2013
Panther Masterclass Part 1: Zimmerit
Having done basic assembly, its time to discuss the single sticking point for many folks regarding the Panther box from PSC, namely the lack of zimmerit. I made a platoon of early-model Gs, (which I'll detail in Part II) and wanted to properly add their zimmerit paste. Thanks go to my fiancee for taking pictures, since trying to do this alone would be either hectic or nightmarish.
First of course, we gather the materials. Here I have my early-model G, with the liquid greenstuff. I find this product not so good at gap filling (which is what they sell it for) but great for adding texture, or making rivets.
First using an older, starting-to-fray detail brush, I dab it on. Dabbing rather than painting gives a nice thick volume, and starts to texture the surface. I highly recommend you do this in small sections, because you want to ensure the greenstuff is wet when you do the next stage, and it's also good to ensure you let it dry before moving to another panel, to avoid thumbprint zimmerit!
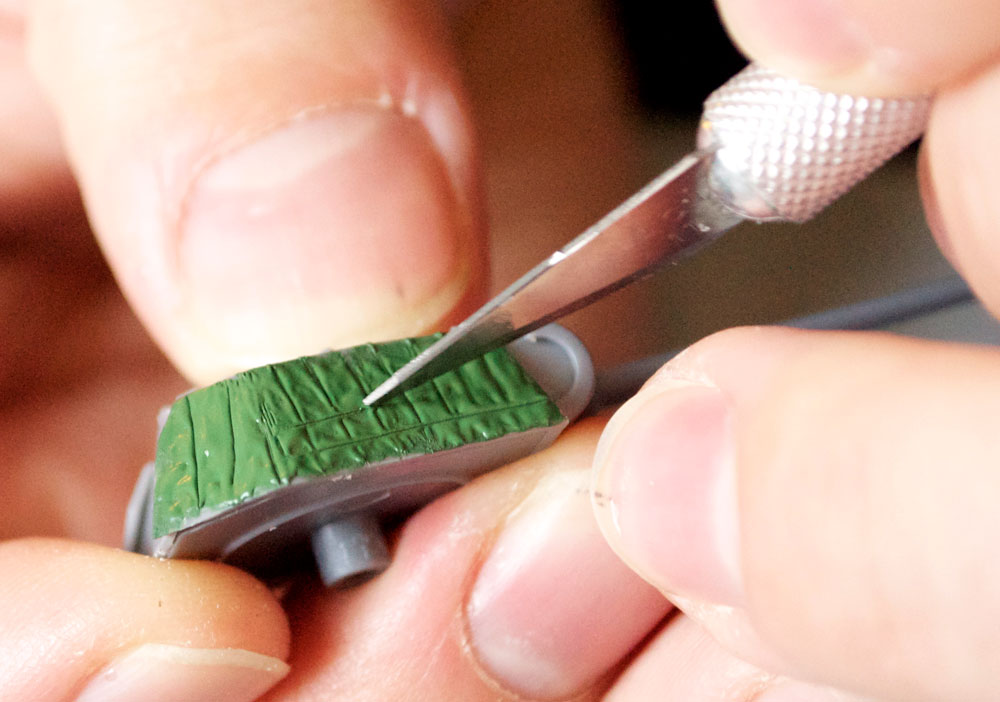
Next I take the sharp end of a hobby knife, and start 'drawing' the lines from zimmerit. For the Panther, these will most likely be lines about half a millimeter or so, and I tend to do vertical first.
Next the horizontal lines, as you can see above, give a nice effect. Sometimes you may have to draw the blade along a line two or three times, and I often wipe the blade off on my fingers, to keep it clean. (You'll see my fingers getting green spots as I go on.)
While the turret side is drying, I move to the hull. Be careful to go around the tools, though the nature of liquid greenstuff is such that it's not terrible if you do end up getting a bit on it. Like the turret side, I dab this on an entire side before moving to the next stage.
Here you can see an entire side of the tank pretty much 'done'.
Another important part is the turret front. There's lots of angles and subtly different parts on this.
First, be very careful not to accidentally fill in the gunner's sight or the MG slot when applying the greenstuff.
Similarly, make certain to get the turret front behind the mantlet, as well as the side, before anything dries.
For the most part, the mantlet zimmerit is the same as the rest of the tank, except two key places: The mantlet side is lined radially, and the gun barrel's slot is also lined, along the length of the barrel. these were done very thinly, and so again I use the sharp side of the blade, even if it's dried.
The rear of the hull is the last difficult part to do. Here you have one advantage, in that the back of a Panther was almost guaranteed to be caked in mud, so you can really go to town texturing it.
once the greenstuff is applied, again I line it, with the stowage bins getting just the thin vertical lines we saw before on the gun mantlet.
And that, ladies and gentlemen, is how a PSC Panther earns its zimmerit! I will have completed pics of the zimmerit next time when I discuss specifics of modeling the early Panther G, as well as making realistic G vents, and then tackling stowage! Best of luck with your own attempts.
First of course, we gather the materials. Here I have my early-model G, with the liquid greenstuff. I find this product not so good at gap filling (which is what they sell it for) but great for adding texture, or making rivets.
First using an older, starting-to-fray detail brush, I dab it on. Dabbing rather than painting gives a nice thick volume, and starts to texture the surface. I highly recommend you do this in small sections, because you want to ensure the greenstuff is wet when you do the next stage, and it's also good to ensure you let it dry before moving to another panel, to avoid thumbprint zimmerit!
Next I take the sharp end of a hobby knife, and start 'drawing' the lines from zimmerit. For the Panther, these will most likely be lines about half a millimeter or so, and I tend to do vertical first.
Next the horizontal lines, as you can see above, give a nice effect. Sometimes you may have to draw the blade along a line two or three times, and I often wipe the blade off on my fingers, to keep it clean. (You'll see my fingers getting green spots as I go on.)
Next, the hull is lined. If the greenstuff starts to go dry (as you can see above) you can switch to the back, thicker side of the craft knife, which will make wider gaps.

Another important part is the turret front. There's lots of angles and subtly different parts on this.
First, be very careful not to accidentally fill in the gunner's sight or the MG slot when applying the greenstuff.
Similarly, make certain to get the turret front behind the mantlet, as well as the side, before anything dries.
For the most part, the mantlet zimmerit is the same as the rest of the tank, except two key places: The mantlet side is lined radially, and the gun barrel's slot is also lined, along the length of the barrel. these were done very thinly, and so again I use the sharp side of the blade, even if it's dried.
The rear of the hull is the last difficult part to do. Here you have one advantage, in that the back of a Panther was almost guaranteed to be caked in mud, so you can really go to town texturing it.
once the greenstuff is applied, again I line it, with the stowage bins getting just the thin vertical lines we saw before on the gun mantlet.
And that, ladies and gentlemen, is how a PSC Panther earns its zimmerit! I will have completed pics of the zimmerit next time when I discuss specifics of modeling the early Panther G, as well as making realistic G vents, and then tackling stowage! Best of luck with your own attempts.
Labels:
conversion,
Flames of War,
German army,
greenstuff,
liquid greenstuff,
Panther,
Panther G,
Plastic Soldier Company,
PSC,
WW2,
WWII,
Zimmerit
Subscribe to:
Posts (Atom)