Showing posts with label clear bases. Show all posts

Thursday, June 18, 2020

Basing Victory at Sea with Realistic Waves

A short while ago, a friend of mine and I decided to start painting up Pacific fleets for the then-digital-only game Victory at Sea (now Warlord Games has released a ruleset. I haven't tried that ruleset so I can't judge it comparatively!)

We grabbed a bunch of miniatures from GHQ, with him taking the Japanese fleet, and I exploring the US fleet. I ordered a selection of destroyers and cruisers that would fit any engagement to start, but of course, being a magpie and rivet counter, that has since expanded to a wide selection including three battleships, three carriers, and a variety of cruisers, destroyers, PT boats, and subs!

Tackling bases was the interesting challenge I wanted to share with everyone today.

I wanted to ensure that I got the translucency effect of water on my bases, had ones that would allow me to grab and move the minis without grabbing the delicate 1:2400 ships, and look good in any photos. I was lucky some time back to pick up a product that offers acrylic paints with texture, and the two specific to this are an ultramarine blue and a pale teal (not photographed):

It goes on a creepy opaque, but dries a shiny translucent blue, and while it was theoretically purchased for pirate models I'll hopefully eventually get to, it worked handily for this!

Step 1 was basing them on clear 1.5mm acrylic I laser cut. I stippled some white on the underside of the base, in a scattered shape that would hopefully look like the churn of a bunch of high-powered screws of a war vessel!

In Step 2 I airbrushed a cone of teal from the aft section of each ship, spreading out and hazing as it went, covering the areas with white painted before.

Step 3 saw the beginning of application of the Blue Deep. The first application was to add a bow wave, and the borders of the aft chop. This was in the darker blue. I used a medium thickness brush that had started to go, so I didn't mind if anything gunked up on it. The consistency is similar to liquid greenstuff, so a rolling shape allowed me to goop it on, and then tease it into shape later with a wet brush.


Step 4 saw the addition of normal wave patterns. I avoided anything too large and distinctive, because I didn't want it to look like the ships were going through intense storm-waves!

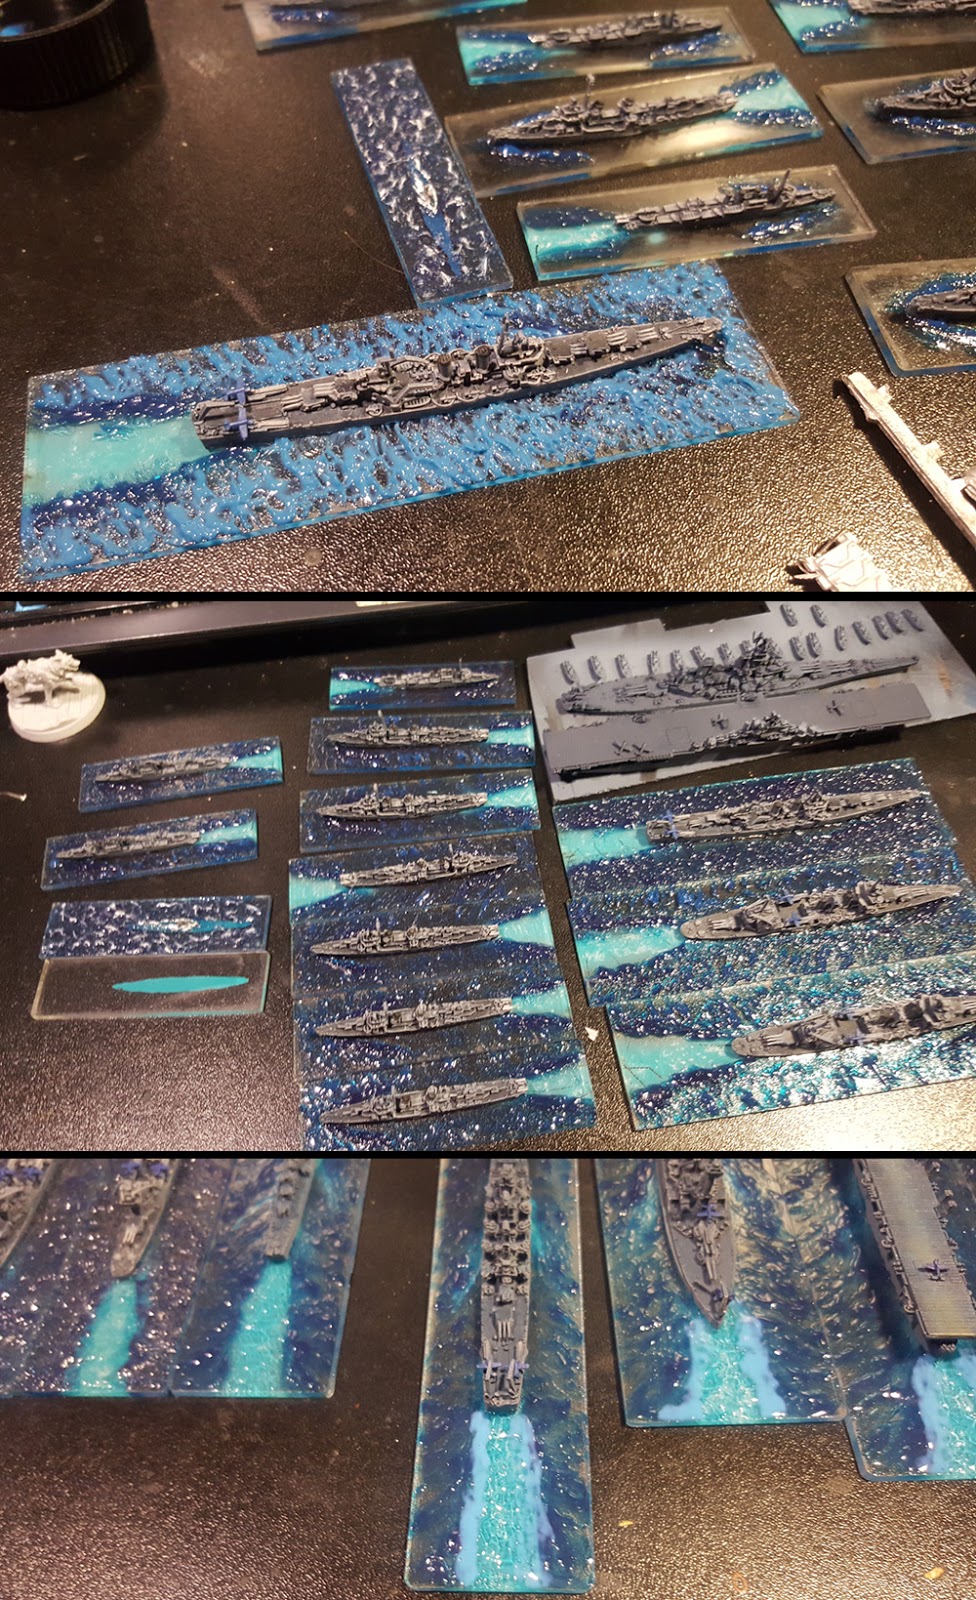
Step 5: You can see here the look of the chop when it dries. At this stage, I added the teal liquid in the aft chop. In thinner coats, it doesn't hold a lot of colour, but does add some refraction to light passing through, helping add depth to the chop underneath.

Step 6: To fade the colours, I applied a very watered down layer of the darker blue to the edges of chop, and add more depth to the under-teal paint so it would look like water disturbed and filled with billions of bubbles.

Step 7 (not shown) is to add stipples and trailings of white acrylic to the top of select waves, and to the bow wake, to represent the chop and foam.

As you can see, the liquid paint wasn't applied so as to be opaque. We'll be playing on water mats anyway, and I'd rather have some of that visible through, so it really makes the ships look like they're cutting through the ocean that's already there!

And finally, a teaser pic of the finished fleet! More pics to come shortly, but as you can see, even on black it really feels like water and waves with ships cutting through!

Tuesday, May 05, 2015

LASERS!

While I clean up and upload more painting pics, I figured I'd post something exciting I did just this last weekend.

I'm a graphic designer by trade, so I have experience working with vector files. Lucky me, vector files are used for laser-cutting! I got a chance this weekend to play with a cutter, and I must say, with a few odd incidents, it was an amazing fun time!

All pics are from my cellphone, so no promises as to the quality, but that, my dear friends, is my first ever laser cut project! Sure it doesn't look like much there, but that's because you're not seeing it...

...after having been removed from the bed! What you're looking at there is a paint rack perfectly suited to Vallejo paint bottles, (or similarly sized ones), measuring 22cm by 20cm, with room enough for 48 paint bottles! (Assuming you don't just shove a bunch in the negative space underneath.)

Once I got it home, I assembled it, glue-less thanks to careful sizing (and I darn near risked needing to file some of the gaps larger) and arranged the paint bottles in a hopefully-logical way (it seemed so at the time for me!)

Of course, one does not merely play around on a laser cutter with just one thing, so I decided to do up a few other files for cutting various samples on:

This is an experiment with different types of plastic: A blast template, flamer template, and two types of "camo markers" for Infinity or other sci-fi games. I very much like the frosted green. It's translucent enough to show through to models underneath somewhat, but also holds the look and feels snazzy. The dark plastic is technically translucent, but came off so dark I don't think I'll want to use it again for these sorts of templates. It'd make a neat variant to the all-clear paint rack though: an opaque and shiny black one!


Back at the apartment, here's what all the various things we printed look like. Large and small spray templates, blast templates, camo markers, and along the back, the real test I wanted to pull together; Clear bases! We have, from left to right, 55mm, 50mm, 40mm, 30mm, 25mm, FoW Artillery, FoW Infantry, FoW Command, and a 1" square with rounded edges meant for me to base Dropzone Commander walkers on so I can go a bit more varied with leg positions without fear of them becoming unstable.

What makes the bases we made unique, and what we're refining now, is they all have little indicators at both sides of them. So many games now differentiate front arc from back arc, and there can be disagreement over lines being applied cleanly, properly, etc. These bases come with the marks already burned into them...

...meaning it's just a matter of aligning the model to face the right way in gluing! We're still dialing in the amount of power to use when etching them, and the size needed, which on these ones isn't quite yet immediately distinctive enough from casual glance. We're eventually hoping to make enough we can start selling them too!

I must say I couldn't be happier. Watching the printer cut is mesmerizing, and it's made me excited to make up a bunch more templates and get cutting again!