Showing posts with label scratch build. Show all posts

Friday, December 06, 2013

Visions of Night

As I struggle with my first significant source-light painting, and with finishing off an entire company of Panthers, I moved once again to my freeform scratchbuild/conversion. Every now and again I feel an urge to build things. It's a puzzle where the 'pieces' are whatever bitz I can find or get, and the 'picture' is as many historical or contemporary photos as I can hunt down.

With that said, I ended up with one 'unassembled' Panther from my two boxes to make the company. I figured I would turn it into a Tank Ace, until I made my company commander cool enough to make him a Tank Ace enough in his own right! It was during my Panther research I came across the Panther with night-vision setup, and the guys at Missing Lynx do a great job of detailing it and showing photos. I knew I had to have one. At first I contemplated doing a "Solution C" but it seems the prevailing belief is that Solution C (three scopes, one each for commander, driver, and gunner) was about as likely as a KV-5. Settling on the Solution A, I first set about making the back bin (which is the easiest), and then after significant delay, set to work on the scope. Here's the pieces I used:

Kudos to anyone who knows what that bottom-centre piece is from!
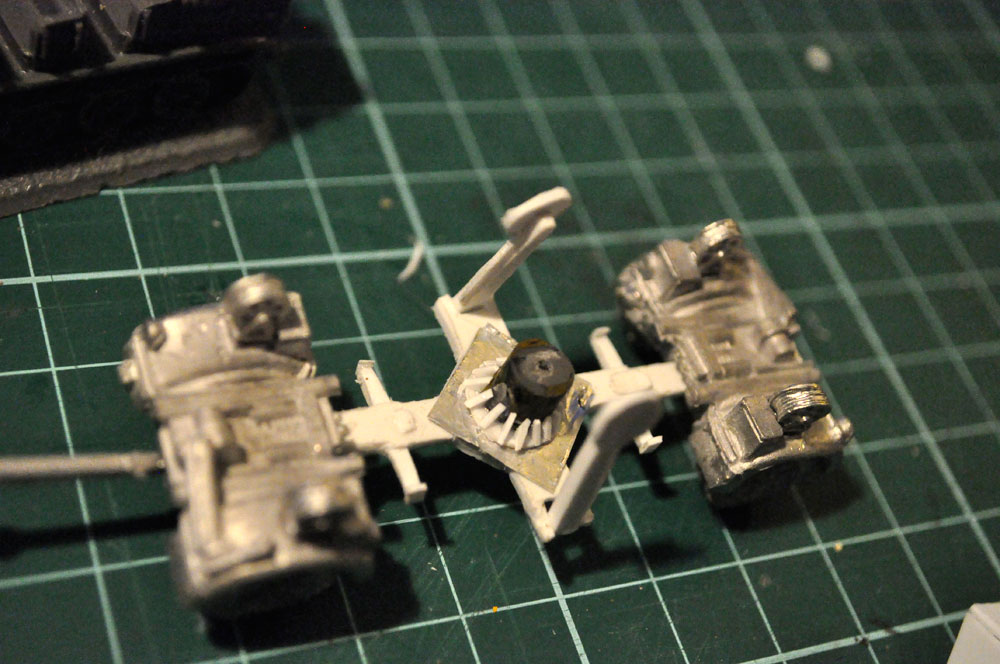
I clipped the back end of a leftover part from another model to form the base of the scope, which was glued to a plastic cylinder, itself on a small triangular piece of plasticard. The lamp is a leftover piece of pewter something which I was lucky enough to find in my scrap bin and almost exactly replicates the size of the device.

So hard to hold on to..
Assembled, this entire device is still only maybe 3 or 4 mm square, and while unfinished, it is now ready for mating to the panther ring.

Peekaboo
First, a commander from the Panzer IV H box was shaved down and slotted into the cupola. After that, the assembly was glued in place, making it look as though the commander is trying to line up the turret.


Finally, liquid greenstuff helped to make the various locking rings for the night vision scope itself. With this complete, the Night Panther is ready for stowage, and then painting!

Sunday, June 02, 2013

Panther Masterclass 4: Stowage and Detailing

For my final post in this series (the painting post won't be a masterclass; there are many fine blogs and forum posts regarding that) I tackle adding stowage and odd little elements of detail to the Panther. It would be highly unusual for a tank to not have stowage, and I'll go over each tank in my force, and comment on certain features that are unique.Almost all my bits of stowage are based off photographs, and I'll try to suggest how common each part would have been on tanks, based on either photographs or documents.

I wish I had a better excuse for the delay on this post, but it was a case of 'something always came up'... On to the models!

First something universal on my Panthers. Here you can see the all-weather plug for the MG slot, which was attached to a cord by the radioman's head, pulling which would open the MG mount and allow him to attach and then fire the MG. On all my tanks I attempted to make the modeling wire look like string in how it lay, and the plugs are somewhat the right size.

Similarly, all my tanks have tow hooks attached using the same modeling wire, carefully bent into hook shapes before being clipped and glued. While fiddly, the end result was well worth the time.

These next few photos would have been photomerged, if CS4 wasn't somehow worse than CS3 for attempting photomerges. My hope was to just have all the rear ends in one go so I could talk as I went down the line. Ah well. Here on the leftmost you can see unbogging logs strapped to the back, and a bucket attached to a rear tow-hook. Fun fact about tanks: I have yet to see a Panther that isn't a wreck without a bucket. Every tank had one in some form or other. The second tank over has a tow cable wrapped around the flame hood, which was made by bending the ends of a length of wire over on itself, then looping the entire thing.
Here you can see a second tank with unbogging timber, and an interesting element on the tank next to it; I have a photo of a (wrecked) tank with a ladder welded on over its exhaust! At first I wondered why the heck they'd want to have to climb over exhaust pipes to get on, until I figured it was probably to deter enemies climbing up during battle, and still let them get up and off when the tank itself wasn't running! Also, note the plethora of buckets along the back end. Since these photos the ladders got a coating of liquid greenstuff, partly to dull the edges of the wire, and partly because I was having some trouble getting the glue to fully adhere. Hopefully that'll work!

Now for the above shots. Here you can see two incredibly common elements of stowage: extra tracks on the sides of the turret, and the sides of the engine deck. This was because the crews believed they would help deflect shots or help with protection. It's up for debate whether it actually did help, but it was common. The other element that was incredibly common is what I call the mickey mouse ears, or awesome subwoofers; the extra wheels on the turret. These were part protection (again) and part 'somewhere to put them'.

Also of note is the last element of my vent project that wasn't finished in time for the last shot; the slat covers on the right hand vents. It took some doing to make this work, as you can see on this one I have the wrong number and width of the pieces.

This was a 'fun' mod to make. At some point the crews were officially allowed to, and started to make anti-aircraft covers for the tanks' vents. These were again fashioned out of pieces of schurtzen, and on the rear deck were meant to help stop lower-calibre bullets, and shrapnel, from entering the engine through the relatively unprotected rear vents. At the same time, they often added a similar spaced armour piece to the top of the turret, making sure to leave a hole around the anti-infantry projector slot, and turret hooks.

Rather than cut incredibly thin pieces of brass to bend into shape, I just took my widest plasticard (1mm or so) and beveled its edges so that when glued in place, it would look to be only as thin as the upper edge, sloping away underneath. The rearmost vent covers are stacked two tall because of their shape.

Here is my 'company cook' tank! He has a pair of cooking pots (one frying pan, one deeper pot) as well as a non-specific burlap sack filled with who knows what kinds of goodies. There's a tarp covering the bag, as well as an oil drum, a pair of jerry cans, and one of my cast extra roadwheels. (The tarp was necessary to cover a massive air bubble in the wheel!) While I've not necessarily seen pots and pans on the sides of turrets, I wanted to add something characterful, and I sadly have a very limited number of german helmeted heads!

One of my platoon commanders sports a piece of stowage I knew I had to add when I saw it in a photograph; There is an image of a Panther tank with a wash basin attached to the turret! How could I not include such a hilariously random bit of kit?
One of my other platoon commanders here with duffel, spare wheels, and a jerry can beside the rear turret hatch. Also with this panther are the rear-deck extra stowage bins. I have seen only one or two photos with these on the vehicle, in part because they were crew-crafted bins made from pieces of schurtzen or other scrap metal. As with the anti-aircraft plates, anything I've only seen rarely, I added just once to the company. Enough to try it, not enough to seem historically inaccurate.

My CO, and hopefully my tank ace, has quite a few bits of fun stowage. First he has a helmet on the back of the turret, so he can replace his fine officer's cap in a hairy situation. You'll also notice none of my Panthers have the AA MG, in part because Flames of War doesn't have it, and in part because it's historically a rare element. Despite that, he is equipped with a personal-use MG34 which I am claiming he has held on to in case he needs to defend his tank, or exit it under dodgy situations. It was common for crews bailing from their tanks to remove the in-tank MG34s to help ensure they got back to their muster points!

More fun stowage on this one is a box containing extra tank shells (over-bright in the shot, alas, but painted it'll be more distinctive) and another relatively rare field-modification of moving the barrel cleaning rod tube to the back deck. The last fun element of borrowed/pilfered stowage: A German Panzerschreck! I had to replace the empty space of the cleaning rod somehow, and had a bunch of these left over from my Kfz. 251s.

Here's the modified back end of the early-G with metal armour plates. Also visible are buckets, tarps, bread bags, a canteen, and a spare wheel. I tried to vary up where and how the wheels were applied so they weren't always ears/stereos, since it was often just one wheel on the tank.

This tank was modified the other way, with the lower, lateral-mounted jack, and two jerry cans in its place. At first it may seem like I missed removing the mould line on the jerry can, but considering the way it was fabricated, this is how I can best represent the curious manufacturing folds.

 Finally, this tank displays another of the ammo stowage bins, and is a good example of what the slide-covers on the right side vents ought to look like. All of mine are open, as I must assume they would have been for battle, and here you can see the proper five slats, offset slightly.

Well, that's the Panther series done, until I get around to finishing my night-vision 2iC to replace the special-character Panther I'm currently using. (I think it's Barkmann?)

I did get a chance to use the crazy heat and humidity we've been having here to bury myself in the basement airbrushing, so the Panthers have since been airbrushed! One platoon is painted with the red oxide colour as base, and the other platoon with the three-colour brown/green/dunkelgelb. At the moment, I don't think I'm quite pleased with the green in some of them (being frustratingly translucent, it came off too dark on the red, unsurprisingly) and the brown misbehaved a bit out of the brush, so I'll be touching them up. Rest assured though, there'll be another post up sooner than this one, as I have another project that just finished the conversion and is happily moving on to painting!

Friday, April 12, 2013

T16s Painted At Last!

After much toil and work, my T16s are finally ready to grace the table! Be forewarned, this post has lots of large images!
All the vehicles have been painted very similarly to my Shermans: Russian Uniform Green paint, overwashed a few times with Agrax Earthshade, with drybrush highlights of the base with a bit of pale sand mixed in. The tracks are Gunmetal Grey mixed with a bit of matte black, the tires are a mix of matte black and Panzer Uniform Black from Vallejo's Tank Aces line. Netting and most of the stowage is a mix of colours I couldn't even remember now, but involves a leather colour, some green, and some pale sand, to make a unique hybridized colour very similar to British tunic colour.
The order of battle markings show my company to be from the Algonquin Regiment of Canada, chosen because it's the closest one to where my family grew up. I had to paint all the 62s by hand (and the green squares) though the Canadian 4th are decals.
The front of each of the T16s has a different specific stowage layout, but all have the extra wheel mounted, which matches the ones on the vehicles themselves.
The interior of the T16s are likewise varied in stowage, one having an extra wheel from the deployed 6pdrs thanks to Tom Stanley's figure standing on one himself.
The sides of each vehicle have a serial number, which is random except for the first two digits, which seem to have been relatively consistent. The rivets were added with liquid greenstuff which, while it's not exactly the greatest for gap filling, makes a fabulous surface additive for subtle detailing. This kind of depth was achieved with only two layers of green stuff, then some careful highlighting to make sure they didn't get lost.
All the guns are magnetized in place by a magnet buried in the vehicle, and a chunk of paperclip in the gun trails. They aren't strongly secured, and will separate on rough surfaces, but it does help reduce the unruliness of the two.


The interior of each vehicle was also intentionally made to be different where I could manage it. Each has the gas tank in what seems to have been the most common place, and has the radio in an appropriate place, but beyond that, I varied up the location of stowage and extra 6pdr shells, as well as doing what I could to throw in different figures for crew. In two cases, commanders from the Shermans from Open Fire became crewmen.
Something else that delayed my finishing of the T16s was that I painted the deployed guns at the same time, to ensure consistency where possible between them. I am at the stage of basing the guns, which I am trying to putty to look like they are in a city, and then this entire platoon will be finished and ready for the table!

Tuesday, March 19, 2013

8.8 Flak 36 Limbered

While the T16s are being painted, I figured I'd show some photos that were posted on Flames of War, but not necessarily on here yet. Here's a project I did along with a Schutzen Kompanie a while back.

In Flames of War, guns that are limbered to a truck to move are just dragged behind. In some cases it doesn't seem too odd, but I still find it a little strange to have a fully deployed gun with its crew, somehow surfing behind a truck or halftrack.

Where this is especially strange is the 8.8 Flak 36. It is a huge gun on a cruciform mount, and until it's attached to its wheel limber, wouldn't move short of a tank hitting it. I did not want to have such a look, and the Flames of War model thoughtfully comes with limber halves. I set about converting the rest to have limbered versions of my unlimbered guns, for when they're dragged behind their halftracks:
 First up was the relatively simple limber and mounting. This was done primarily by tracing the metal one provided by Battlefront, with extra pieces for the most part using leftovers. The centre of the limber has two pieces of tinfoil, as well as some extra sprue bitz and small cut triangles. The front and back are the metal provided limber halves.

Next came the gun. For this, I got various sizes of plastic rod, combined them with carefully aplied pieces of tinfoil, and modelling wire, and carefully glued each piece, again using the BF one as a guide.

Here's the breach end. Thin plasticard, as well as a thicker clump grooved out simulated the actual breach, with remaining detail being a mix of plasticard, wire, and tinfoil.


The base of the gun went next, and involved a bit of guesswork. The detail is simplified from the real gun, as I hope in most games to not ever have to use their limbered versions! Again, the BF gun shield made a great trace proxy for the custom version.

Here's the full limbered gun, pre-painting. The gun wasn't glued facing down that far, but rather straight ahead. In the background you can see the deployed 8.8, and why I didn't want to have it just 'surf' behind the halftrack.

 And here it is painted up! The 'barn doors' have been painted with a grid pattern, which simulates how the deployed one was painted. While its detail is not exactly on, it does bear enough of a resemblance that from 'table distance' they're indistinguishable.
 Here as well is the only place it's distinctly not the BF version. From the gunner's seat, a couple of the detailed control knobs are just cylinders. Otherwise I'm very pleased with how it turned out, even if they sadly (luckily?) have yet to make it on the battlefield.

Friday, March 08, 2013

T16s nearly done!

So I have finally managed to cast, and glue in, the remaining T16 crew! With them came a huge bunch of stowage, enough that I feel any more would hinder its combat role. I have (since these photos, black-sprayed them, and given the initial airbrush of green.
 
Here they are, all lined up and ready to go! The metal 'guards heads' from BF were incredibly useful for the casting, and to the right is the command UC that comes with the box set of 6pdrs. In a couple places, just to add variety, I have inserted British tank commanders from the Open Fire set. I can also say with hindsight, having basecoated them, that the rivets work! Liquid green stuff, with one or occasionally two coats to thicken it up, will indeed look like rivets if applied carefully! Much less work than trying to cut plasticard or paperclip to length and filing it back!

The other rivet counting thing I did was add the metal frame protector for the front left headlight. I had some spare PE metal sprues laying around, and carefully cut and bent them to length. Though they were easily the finickiest things I had to add to this project, the effect is, I think, quite strong!


In similar news, I have decided that rather than turning the remaining three otherwise unused Shermans from Open Fire into wrecks, I will convert them to Fireflies. Canadians in late-late war get to bump Sherman troops up to two Fireflies each, and this will give me a low-cost way of doing just that!
This project has certainly been more straightforward, but I think I'm less impressed with the outcome:
First, the tanks were assembled save the gun barrel, and the mount for the hull MG was shaved down. Next, I cut lengths of plastic rod to roughly the right length. The gun mantle was cut to accept the new barrel size, and stowage was prepped to cover the hole on the hull.
Next, copious amounts of putty were added to the ends of the barrels, so that I could shave them away for the muzzle brake. The turrets were then modified to have the second escape hatch, and since these photos, I have cut back the muzzle brakes, sloped the base of the gun barrel appropriately, and added a PE metal piece 'hatch hinge' on each. I've also added the externalized radio, and two storage bins to the backs of the turret. I'll put more photos up when they get further along, but as you can imagine, the next little while will be devoted to painting T16s!

Saturday, January 26, 2013

Minor update to the T16

Hey folks, progress has been slow just the last little while, as I had some indecision regarding materials. In the end, I decided to do this with plasticard for the sake of durability.

I've seen three primary types of track guards: The first is this one above, with a solid band along the back with the big drop front, which was done in two separate pieces of my thinnest plasticard, bent to glue in place. The front section is glued to the top track guard, while the second is bent further and glued to the underside of the tracks.

This is the second type I've seen, which has the same front end, but a different, two-piece guard along the back. To exaggerate the look (and the fact that these pieces get all bent out of shape) I used two pieces to fill it in.

Also, in these two images, you can see that I've added what few rivets there are on these. I'm using liquid green stuff, which when just dabbed on the surface will bubble. It can take two or three coats, but I find it easier in 15mm than trying to use rod or similar. I've heard superglue will serve the same purpose. I've also started to add stowage (most visible here is the pair of spare T16 wheels, and an extra wheel for a 6pdr.)

I hope to cast the final bits of crew on Monday, and finish the assembly on Wednesday or Thursday, when the resin dries.

Tuesday, January 08, 2013

Making Camo Nets

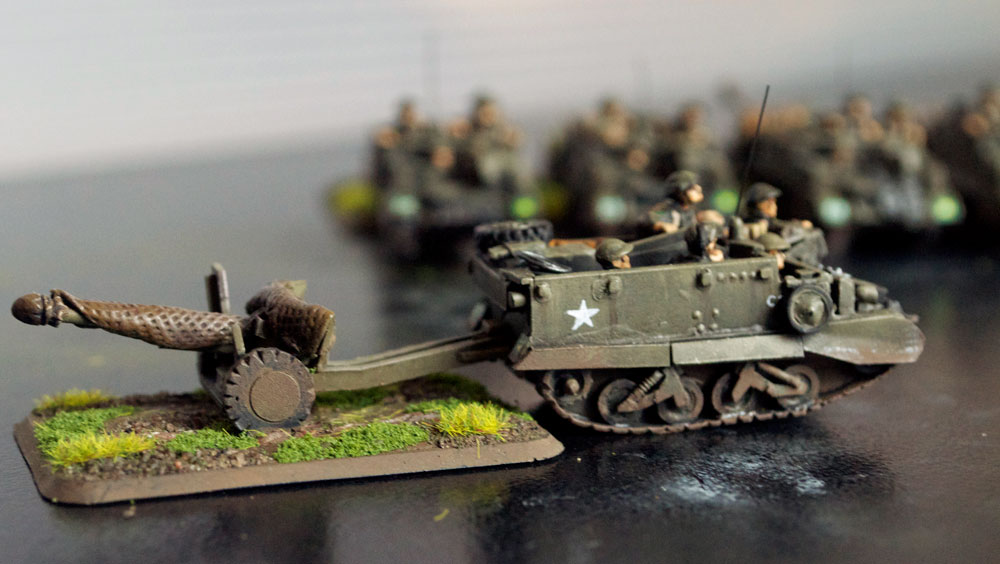
When 6pdrs were limbered, it seems they were almost always given nose caps and nets or blankets of some description over the breech. I wanted to test out a method of covering them based on my work making decorative bases for my Malifaux figures (which will feature perhaps in tomorrow's blog.)

I found a method that seems to work fairly well, and gives an accurate-enough looking camo net.


Stage 1:
First, mix up an amount of epoxy putty and stretch it as much as possible into a roughly rectangular shape. The more rectangular you get it, the better, but with what we'll be doing, it shouldn't matter too terribly. You'll notice I've moistened the board beneath the putty. I didn't find this to work 100%, so I'll have to figure out another means of preventing the putty from adhering to the cutting board.

Stage 2:
 Next, I use the smooth part of a craft knife to make certain it's good and flat, and also to spread it out. The thinner the net, the better when it gets applied.

Stage 3:
Next, use the part of the craft knife that has the nice diamond-patterning on it to thoroughly groove the surface of the putty. You will want to make these as deep as possible, because any and all handling is going to degrade the sharpness. It's also important to note that with the shape of most holders, if you try to roll successively further along the length of the blade, you'll end up obscuring earlier detail as the smoother part of the holder rolls over previously grooved surface.

Stage 4:
the next couple of stages are pretty much repeat as necessary. The orphaned blade now gets used to cut the shape of net needed based on coverage. Because the net is going to get all bent out of shape, you'll notice I'm not terribly concerned by the lack of a crisp edge at the bottom, but I have initially tried to avoid the parts that are more curved.

Stage 5:
Now, use either the orphaned blade, or in my case a sculpting tool, to carefully remove the net. It's going to warp some during this, so try to minimize it by going in gentle sweeps along the length of the net. Make sure the sculpting tool (as should any tool using Epoxy Putty) is moist.

Stage 6:
At last we've reached the fun part. Gently lay the net over whatever surface you want to apply it to, and using a pointed tool, push it into place. The advantage of using a tool with a point (dental pick, sharp sculpting tool, blade) is that you can poke in the gaps, and retain the look of the camo net. Anything broad and flat or rounded can end up 'cutting' an odd line in the net.

 Stage 7:
The edges of any piece should now be worried with a blade or sharper sculpting tool, to look frayed or edged in hessian strip. If this step is skipped, the sides will look oddly un-textured, and the effect may be ruined. It also helps to thin down the edges to give the entire piece the perception of being only the thickness of real camo netting.

I have also used the camo net on the deployed guns, but only around the barrels. For the limbered guns, both the gun barrel, and the breech area get coverings. (Historically, I claim camouflage and travel cleanliness respectively. Honestly? I didn't want to have to sculpt detailed breeches on the guns!)


And here's the full battery of 6 unlimbered, and limbered guns, all with their camo nets.

 As a bonus feature
Here's what a Firefly VC looks like with this camo net concept applied. This was the first attempt, and you can see what happens if you use a rounded tool to push the net into place (over the front hull where the machine gun was removed.)