Friday, June 05, 2026

Hetzer 38(t) for Bolt Action Rescue Build - Part 4: No Detail Left Un-Converted

 A continuation of last post, yet more tiny fiddly details get added on to this spg, in my efforts to be as accurate as my sanity allows! Right into more:

Tank Jack
Curiously, the model didn't come with a tank jack. Not just the used one, but from-kit it was missing. After much digging, searching, and back-and-forth, I felt confident enough to take a swing on this. I did cheat a bit by using some 120lb cardstock, but that was just to avoid doing a dozen layers of paper!

I did a compilation photo for ease, but the steps were
Top-Left: Size the overall jack when it would be in place, cut a bunch of pieces to size, shape and cut again.
Top-Right: for the parts of the jack that are thicker, using 120lb coverstock and slightly offsetting the shape, I had thicker endcaps.
Bottom-Left: A frenzy of gluing together, some trimming (see top off-cut), and then more bread tag nubbinz to be the final elements, baseplate, etc.
Bottom-Right: A paperclip once again gives me enough material to approximate the crank handle.

After all that, some liquid greenstuff to create the curved cast-section, and then glue the whole mess in place on the right-rear mudguard.

Fenders Finishing Finesses
Since it's mostly visible above, this stage also included some final tweaks to the fenders and schurzen.

Using some leftover strip of the paper (before making the jack, hence why there's so much!) I cut two small pieces to fill in the missing spaced armour bracket shown by the red arrow. Sizing it out, I was lucky in that half the paper strip's width was just enough for what I needed!

Cutting the pieces out, I then very carefully bent them again with my handy tweezers and a thumbnail to gently give the L-shape.

The pieces were glued in place carefully. Note the vertical section of the bracket is forward facing, and the entire piece angles towards the back. Once the glue was thoroughly dry, I carefully sliced off the bit of bracket that stuck over the skirt.

Actual Commander's Hatch
Since the other hatch turns out is not the commander hatch, it's time to go off the rivet counter deep end and make us a proper commander's hatch and viewport!
Popping off the front half of the hatch was easy, using the dental tool for gently engraving the gun swivel joint. It was then glued back into place in an "open" position.

Next, some pieces of model support from 3d printing were delicately cut and sized to simulate the commander's observation periscopes. (See? We CAN'T throw anything away, we needs it!) Some liquid greenstuff softens the curve and gives that slight bulge out of the housing.

Now we need to stick a commander in the tank. For my purposes, no "torso out waiting to be shot" commander.

First we delicately pop up the rear section of commander's hatch (after the periscope was dry...)
Then, I grabbed a spare head from the Winter Grenadiers kit with an appropriate Heer cap, delicately Frankensteined off the part I didn't need, which as per above, we must clearly save for some undefinable reason!

The cap, glued into place, simulates the commander peering through the scope trying to get any idea where his tank is going, where a shot is landing, and if he's about to be swarmed by the enemy in this half-baked vehicle. Finally, the remaining piece of commander's hatch was glued back in place half-covering the hat.

Headlight
Another curiously-missing-from-original-kit is the headlight. It's a fairly simple build using more spare bitz laying around.

First, a pin hole is drilled, and an appropriate length of paperclip inserted. Next, a piece of pewter flashing (from another Warlord build, in fact) was cut to size, and while still 'raw', a hole was drilled in the appropriate spot. My trusty pliers made for smaller, stronger, grips to keep everything in place.
Out with the rasp again, I shaped the light, thinned the 'front' underside, and beveled/sloped all the other sides. Finally it was glued into place. Once dry, a bit more liquid greenstuff gave a top curve (not photographed.)

Gunner's Sight
Then came the stage where I did actually ask the wife if I was "going too far". Fantastically she said "not only do you need to, but I feel like I would be mad if you didn't!"

So it's her fault.

The default gunner's sight (visible in the picture above) is just a bar of resin. Not only does it lack the detail of a real gunner's sight, but it's not even the right shape! Clearly this is unacceptable, so we get to work.
Step 1 is of course to get rid of the wrong one. Handy model saw to the rescue!

Next up, out with the pin drill(s). Drilled a hole where the sight itself will be seated, as well as a shallower, thicker hole with a larger drill bit. The actual gunner's sight has a bit of gapping around it in its socket, so this lets us simulate that while still being able to pin the sight for stability. Finally, another small piece of leftover 3d print support becomes the top of the scope with another very careful drill hole!


Finally, once the sight is in place, two more drill holes and a "croquet-wicket" piece of paperclip forms the protective bracket for the gunner's sight.

Another point of contention with this vehicle: Why would this be the solution with the MG right behind it, basically bumping the sight any time it's swiveled? Engineers... think about the field application of what you make!

Final Fiddlybitz
Lumped together is in essence "All the other changes I wanted to make" lumped into one;

The rear mudflaps technically have a thin ridge, as opposed to the modeled 'indent' - Some final incredibly tiny pieces of paper glued in place fit this mod.

The jack's wooden block got three small strips of paper to be the straps. (Also visible is the headlight's greenstuff layer)

Thanks to the brush from our hand-broom and dustpan, I will have a nearly endless source of pliable, bendy, sturdy radio wires. And, if I keep taking from different parts of the brush, you don't even know I'm taking any!

And with that, the build stage is done. Enjoy a glut of images showing every angle of this entire build project.

The completed Hetzer, before priming, to show off the extent of conversion. Viewed from front-left.

The completed Hetzer, before priming, to show off the extent of conversion. Viewed from rear-left.

The completed Hetzer, before priming, to show off the extent of conversion. Viewed from rear-right.

The completed Hetzer, before priming, to show off the extent of conversion. Viewed from front-right.

The completed Hetzer, before priming, to show off the extent of conversion. Viewed from right.

The completed Hetzer, before priming, to show off the extent of conversion. Viewed from left.

The completed Hetzer, before priming, to show off the extent of conversion. Viewed from front and back.

The completed Hetzer, before priming, to show off the extent of conversion. Viewed from above.


Thursday, May 28, 2026

Hetzer 38(t) for Bolt Action Rescue Build - Part 3: So Many Details (So many pictures)

 I'm going to keep this organized by section of the vehicle, rather than necessarily the order I did things in, because Gorram did this project keep revealing new things that needed to be modified!

*Loader's Hatch
Last time I referenced redoing the commander's hatch. I did some digging and photo-research as I was building things, and discovered I was incorrect; the hatch I thought was surely the commander's one, what with the MG, Warlord's commander figure, etc, is in fact the "everyone else" hatch.

Warning if your favourite vehicle is the Hetzer, I am increasingly negative towards it!

A slideshow of various sizes of drill bit being used to create the hole for a magnet
But, while I still assumed it was the commander's hatch, I decided I wanted to give the option to have it both open and closed. That can only mean one thing: Magnets! I find doing an increasing drill size from paperclip diameter up to the 1/8" magnets diameter is a far smoother, less painful, and less mistake-prone way.

A plastic and paper remake of the tank's hatch
After that it was cutting more of the bag clip to size, scoring the centreline to give two hatch pieces, adding some paper tab "hinges", and a handle made from another scrap of plastic.

Tow Cable Assembly
The tow cable seems most often to have been hung off the back of the tank spooled into a loop. I am cheating away from my "stuff anyone could have" by using model-gauge wire for this step.


Also a curious note; I can not find a single period-photo showing the horseshoe-shaped tow hooks on an actual Hetzer! I'm not saying they were never there, but as much as they're in model kits, museum pieces, and recreations, any pic I've spotted with the tow holes, they're empty!

I wound a bunch of wire around a relatively-cylindrical tool of roughly the right circumference, bent the ends into a loop, and then wrapped two pieces around as I've seen in numerous photos. Next, back to the trusty pin drill and bulk paperclips to provide the hanging hook for the whole deal.


 Once in place, everything got glued as little as I thought I would need to keep it all where it needs to be! Certainly I could have done more work on the tow cable ends, but at this size that would be a showpiece thing to do, not a gaming-table thing to do!

Spare Tracks
Since we're already on the back of the tank, and the towcables are glued in place, let's add on some spare tracks!

First, and critically, we check to make sure which parts of our rapidly-diminishing tab can fit as which pieces of track! Luckily a tiny offshoot sits perfectly in between the engine hatches, leaving the big piece for one of the rear sections.

The track pieces were then carefully cut to width, marked off using an existing section of track to get distance, and then using a rasp, dimpled to simulate multiple links at once.

Next up, tiny wee pieces of card that had been offcuts previously were glued in two parallel lines to simulate the teeth. The unphotographed hero of this stage is my tweezers, to make up for my big fingers!

Once I was certain the superglue was well and dry, it was back to the rasp, carefully shaping the strips both into teeth, and then along the channel(s) to thin them into a more Toblerone shape.

Once glued into place, a very thin strip of the bread tag's paper section was glued in place to form the track holder. Done in stages, it was 1: Glue perpendicular to tank, using side of track. 2: Once dry, glue the top in place and then, while still wet, press a craft knife such that the bottom is simultaneously held in place to glue and cut through at the right length, followed by 3: keep a close eye in case anything comes loose in the drying process!

And here we have it: the entire backside glued together, set up, and pretending to be a working tank!

Next time we'll go over a few of the other picky attachments, some of which are visible in wider-angle shots in this post!

Thursday, May 21, 2026

Hetzer 38(t) for Bolt Action Rescue Build - Part 2

 Today, we create some Schurzen for the Hetzer build.

Luckily, the bread tag I used for this had a piece of cardstock attached to it that was eerily perfect length for this next step. it took a few cuts to get it down to the right size, but the advantage of using cardstock paper over some thick plastic or metal, is that we can bend the spaced armour up like often happened in real life.

The nature of Schutzen and tank drivers (and tank life) was such that these thin pieces of metal routinely banged into things, or rubbed against trees, walls, fences, etc. Being that they were less than an inch thick, we also have the benefit when using cardstock of making them approximate more closely the accurate thickness.

If this wasn't a "low budget" build, I might go digging up some old scraps of photo-etched brass pieces I have, see if any would work for this!


First up, we measure and cut the paper in half, for obvious reasons. In dry-fitting and testing, I discovered that the paper was actually way too thick for the Hetzer, whose schurzen barely reached past the top of the road wheels. You can see in the second image where I was drawing an indicator line for how high up it will need to be trimmed back.


Next up we cut down the pieces, and glue them in place! Simple and quick, and looks as good. At this stage, don't be afraid if the pieces aren't entirely lined up. In most cases I've seen, these plates were fairly roughly held in place as well, and often look like no one who stuck them on was aware of what a level even is.

Also at this stage (but unphotographed for the time being), I took a set of tweezers, and delicately bent the plates, trying to simulate the typical damage and weather these would see. Don't go too extreme, unless you really want to indicate severely damaged plate and a tank that has seen some heavy combat!


Now that the mudguards and spaced armour is done, we can have some fun with those tiny details that will make this project feel 'just right'.


This is the top of the gun housing. For anyone who's really up on their Hetzer tech, we are missing the gun swivel! This gave me pause for a bit, since it requires me to somehow carve in an almost-bullseye shape.


After overcoming my fear of potentially messing something up, I carefully traced two circles in the right location, and as close as I can figure to the right size.


Next, using a metal dental pick I was very kindly given years ago, I gently and repetitively gouged a trough following the outer circle line. It's best to do this carefully, assuming it'll take a few times around to get to the right depth and width, as pushing too hard could both break the pick, and if it jumps, scar the model in the wrong way.


Finally, using a drill bit, I cut out the inner circle, followed by a bit of a touch-up with a 1/8" drill bit. Later, this will get filled with a bit of liquid greenstuff to flatten out the divot, but still a world better than "no pivot at all"!

And now we're pretty much caught up to where the build is. Unfortunately, in process of receiving this as used, one of the commander's hatch covers has gone missing (if it was ever there to begin with.) To fix this, we will be using more bread tag pieces, magnets, glue, and just a little bit of madness. That's all for next time though, since the build is still in-progress.

See you in part 3

Friday, May 15, 2026

Hetzer 38(t) for Bolt Action Rescue Build - Part 1

I have finally gotten off my rear to start posting something again! I am terrible at taking pictures, so many of my builds pass quietly without good documentation or stepping.

That said, I was lucky enough recently to secure an old, second-hand, Resin-and-metal Bolt Action Hetzer! It is definitely showing its wear and missing a few details and components. I of course do not hold the seller or the original owner to account for this, because the more I dug into the research portion for this kit, the more I discovered apparently Warlord just didn't supply some of the gubbinz visible on real-life models of this tank!

A resin and metal model of a one-to-fifty-six scale Hetzer, in pieces.


I obviously needed to bring this up to a rivet counter's standards, but also wanted to experiment with 'low tech' solutions along the way. Sure I could just order a parts kit, or 3d-print components I need, and sure I have access to fancy plasticard, but what if someone doesn't? How would someone go about making a higher-tier looking kit despite not having higher tier supplies?

First and most importantly, why not try replacing Plasticard of various thicknesses with... a bread bag tag! (Or in my case, a bulk food store tag.)

The Hetzer, as well as a box cutter, snips, and a rasp.

Note above that the Hetzer has had a nice long bath in some Simple Green, followed by a gentle scrubbing wtih a metal brush I have. Whatever primer first base-coated the tank, it was better than any I use! Normally just a toothbrush clears it off, but this one I had to scour.

The easiest place to start getting this up to needed shape, and the one that required only a pin drill (not shown), was to hollow out the exhaust tube.

Right-rear of the tank, showing modifications to the exhaust

Next, we fix the gun. It glues on strangely at the best of times, but as I looked to see exactly how it should go together, I also discovered it sits in a really odd spot on the vehicle anyway. "Shot Trap" immediately came to mind. For my purposes, even after gluing it in place, a casual side-on glance shows a weird terminus to the gun I could not allow for.

The base of the Hetzer's gun, with green stuff to fill in the parts left open by the model

Luckily, some greenstuff crammed under covered the problem nicely, and adds some much-needed stability not provided by just pinning the thing in place. Also visible here was my drilling out holes for the tow cables. Curiously, while I know there should be horseshoe connectors here, I can't find a single period photo that shows any in place! I'm going to leave mine off in solidarity, and totally not because I don't want to bend modelling wire into consistent size and shape four times...

Now, on to those mudguards.

A triptych showing bread tag with cut squares on the left, the middle showing sloped mudguard pieces in place, and the right showing how to trim them down.

First up is measuring out the space for the mudguards, adding a bit more for 'shrinkage', and cutting them out. The Hetzer mudguards have an interesting L-shape, so those were glued in place using a scrap cut after the first pieces were removed. As always, I glue more in place than I will need, and then trim down to exact size after.

A triptych showing the mud guards glued in place on the left, the middle showing small sliced pieces of plastic for the waffling, and the right showing them glued in place.

Next, once the angled pieces are dry and cut down, we glue in the square sections. The left front mudguard has a waffle pattern on it, which was accomplished by shaving down some of the pieces to very, very thin, and then spreading superglue across the entire mudguard, gluing the pieces in place, and then trimming them down when dry.

Since I have fat fingers, I was using the craft blade itself to 'stick' the pieces to, trusting that once in place  the glue bond will be stronger than the knife bond.

Left image shows a piece of cardstock held in place to become the mud guard lip, right side showing it trimmed down

Once the mud guards are well and truly dry, we can use strips of the paper part of the bread tag to form the front flap of the mud guards. Especially for these, glue in more than you think you'll need, and then shave it carefully down. It's tough to guess beforehand and not worth being wrong.
Left image shows the mud guards from a top-down view, right image shows the wooden block being glued in place.

Finally we can see the sloped front of the mud guards, as well as some liquid green stuff to gap-fill and assist with curving. The last step is to glue in a small piece of wood (craft wood stick is almost ideal thickness) to represent the wooden block I believe to be used as a base for the jack.

On part 2 I'll show the process for Schurzen, as well as a few other next steps.

Tuesday, November 08, 2022

Orcs of the Northern Steppes

 A friend is creating a skirmish game centred around various small warbands venturing into the realm between worlds for fame, fortune, or other nefarious to noble purposes. That thin excuse was enough for me to justify getting miniatures from a company I am super excited to champion, (Yedharo Models) because their models are fantastic, the company itself is lovely, and orcs that look distinctive is always a joy.

I will say if I had one minor complaint it is that the scale between the male models and females is wildly off. a 32mm "Female Champion" is 48mm, while the "Male Champion is a massive 63mm. This leads to them looking wildly out of scale with one another, which makes a mixed-gender crew more bizarre looking. Considering most of the male models don't fit on the default base size for my friend's game, I have a convoluted lore reason why the warband is entirely female.

Enough talking, pretty model time! No surprise there are lots of conversions, because it's also me...

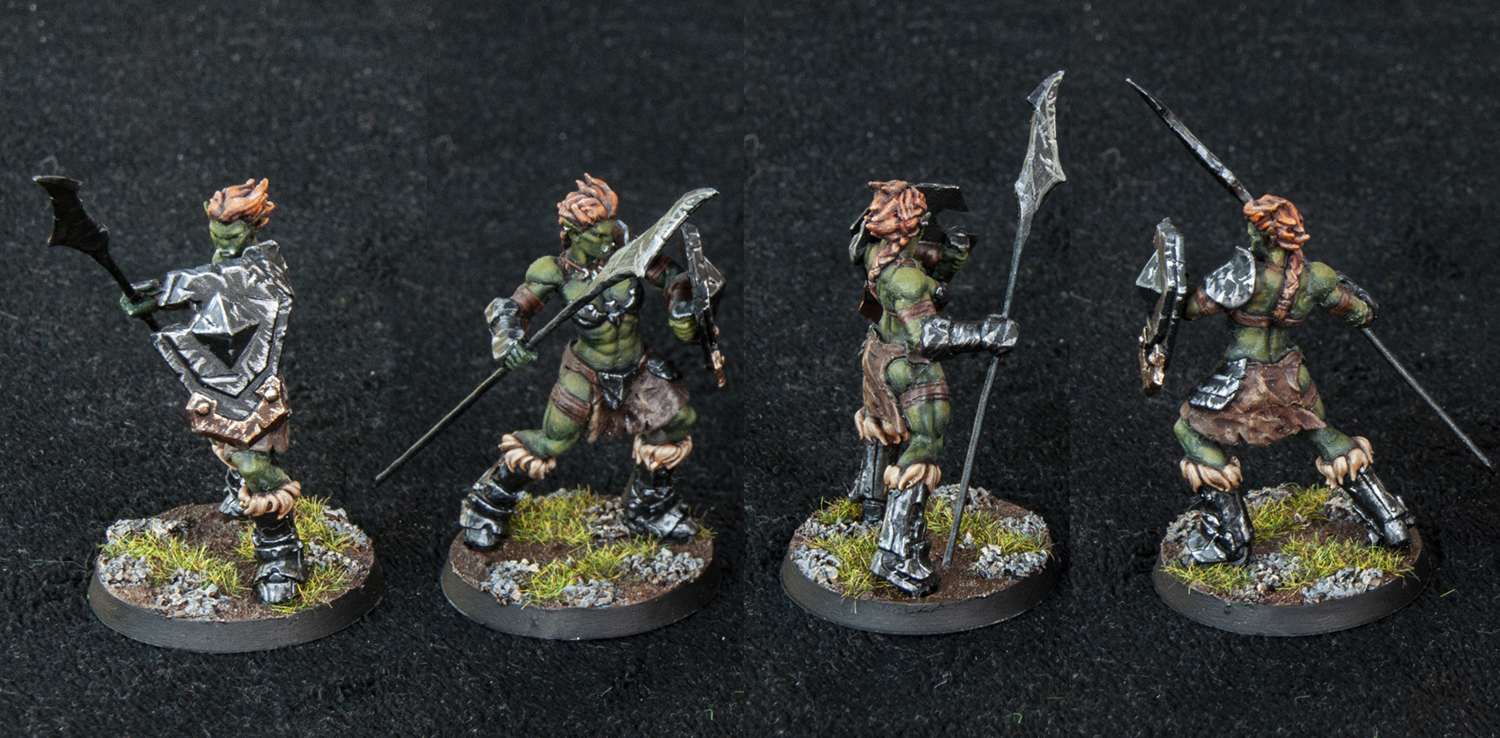
First up is the Champion. Equipped with a two-handed axe, covered in scars, with the bright fiery red I decided to paint all the orcs with, and somewhat covered in battered orc-steel armour. The green took a lot of experimentation to get feeling right. I didn't want hulk-neon, but I also didn't want to mute the green into yellow. It's a mix of a variety of made-for-war-vehicles greens, browns, and yellows that are almost impossible to do a step-by-step for! The red is a fun mix of Vallejo Mahogany Brown, through light brown, to bleached bone with a few glazes of an orange-y red.

The metal itself was a bit of an experiment. Gunmetal washed heavily black, highlighted back up to silver with lots of scratches and chips to make it look well beaten. I debated washing it with either green (like Skyrim) or chromed blue, and in the end settled for a very subtle blue glaze on the first layer only.


It just so happened that I backed their 3d kickstarter and got an STL of the champion as well! Having two of the same would of course be silly, so for variety's sake, I turned one of them into a great-hammer wielder. Same woman, different weapon du jour. Fun question for comments; which is the 3d print and which is their mould?

The hammer itself was a fun conversion. Delicately removed the blade of the axe, and then kludged together a part of the axe with plasticard hammer head. I wanted this thing to look a more reasonable sized war hammer that still evokes something fantasy-orc sized.


Next up: any good war party needs ranged cover! Archers are terrifying, and orc-strength metal bow wielding archers are presumably doubly-so! The physics of a metal bow would be fascinating but here we are! Kudos to Yedharo for doing an astoundingly small, durable, detailed trio of archers. They're 'missing' the trademark orc boots, but hey; they're fleetfoot archers. I did a bright red feather mostly to contrast all that green and brown, but otherwise kept to the same consistent scheme. All the 'leather' bits were highlighted with a hatching-style to imply rough and durable, well-worn leather made to keep up with a lifestyle of jogging across the steppes fighting everything from wolves to raiding parties...

Also one of many perpetual kudos to Yedharo; the poses on these archers is fantastic. Where they're in a dynamic pose, there's a tactical rock to ensure base adhesion still holds. Even the archer-default shooting model is bracing against a rock, and the dynamism of the other two lends a distinct impression of 'ranger' over the stoic and staid poses of many rank-and-flank archers.


Next up is the probably least-converted miniatures short of the archers in my entire force. I also decided narratively that these warrior women have the concept of "Battle Braids" - Noteworthy deeds justify more or wilder hairschemes. The initiates are archers (safely learn combat from a distance) with short, unbraided hair. The champion has her mid-back length ponytail to highlight her prestige. By contrast we have these two. The axe/dagger woman has a half-shaved head and is working on enough length for a braid, displaying her relative 'youth', whereas the great-axe orc has a full and complex set of braids, showing off her experience. 

The Yedharo orcs (male and female... though of course mostly female) have a bit of a battle-bikini problem, so I added a putty half-skirt to the axer as well. It's still open on one side for mobility, but she's swapped the traditional loincloth with a bit more thigh protection on her 'off-side'. It's hard to tell by final highlight, but she also started from a much darker basecoat.


Next up is the front-line combatants! The Shield Trio was a fun set of conversions with various degrees of modification. First up is mace-and-shield, who is also a very new warrior lacking her braids. The shield she is equipped with is a mix of plasticard (the base layers of the shield) and green-stuff (the diamond boss and rivets). She is otherwise an un-modified warrior, merely replacing a weapon with a shield. (Strangely, her model doesn't seem to exist on their site anymore!)

Second is a spearwoman with that perpetual paperclip spear-haft, with a chunk of axe handle butchered from another model in the vein of two-hander axe from above. She too has a battle skirt rather than loincloth, but also sports some custom-puttied shoulder and thigh armour. I also puttied in a battle braid similar to the Champion's, to highlight her years of experience.

Last up is a very traditional sword-and-board lady. Her battle-braids mark her as well as a long-veteran, and she's actually not converted at all! Yedharo made her when I was in the middle of converting the rest, and I had to add her to the crew. Her shield doesn't match the other two, but who knows; different armourer, older/newer shield, or personal/familial preference?


Not technically included in the crew in most battles, but I had the minis and had to use them was the banner bearer and musician. In the concept of the skirmish raiding party, a pair of orcs standing around announcing "HERE WE ARE" doesn't make a ton of sense, but they're so cool! The absolute badassery of the banner-bearer's pose and expression, the pseudo-Warcraft vibe of the banner's shape, and her distinctive two-blade cleaver/machete marks her as an instant too-cool-to-not-paint. The hornblower is a far more 'obvious' pose, but gets kudos for the detail of the horn itself, and also the puffed-out cheeks to clearly indicate she's mid-battle-call.

I haven't decided on what symbol or markings to do on the banner. I keep waffling between more Warcraft-style symbolism, First Nations art style, or not-yet-specified "option c". Opinions welcome!


Nearly-last and OMG Most is the Orc Queen. In my warparty she's the bruiser who's extra-large, extra-armoured, and extra-badass. Rather than being an alternate raid leader, she's the heavy who gets called in when something really needs to die. She is possibly the next-to-most converted mini in the crew. Unfortunately her unconverted model lacks the boots, and has a battle-bikini rather than the back-flap. I had to give her the same boots as the rest of the party, which helps to balance out the armour on the rest of her. I love the pose, the giant greatsword (great-cleaver?) and crown wrought into her helm. It was fun to try to make her boots feel like the rest of them. I find greenstuff by default has too "soft" an edge, so this was at least three layers of putty-dry-slice-putty again. Overall I'm quite pleased with the effect of it matching the rest!


The ultimate, and hardest-to-photograph mini in my party is the Battle-Sage. This is the most extensively converted mini of the crew. Technically the base model is the greataxe-woman from before! After a haircut and shave, re-pose of her left hand, addition of skirt, pouches, cloak, hood, and staff, she's now nearly unrecognizable. In her hand she brandishes a totem of jade, and on her back is an obsidian dagger. Her staff is made up of a piece from a Sylvaneth druid attached to a paperclip coated in liquid greenstuff to make it look like a sapling pulled from the ground for exactly this purpose. Tied to it for ritual purposes is another jade token, some raven feathers, and rings of precious metals. As the women of this tribe do battle and interact with the other races, so do their Sages lead the parties and ensure the wisdom of the tribe is foremost in all dealings. Being a Battle-Sage she still wears the steppe-defeating boots, battle-bra, and groin armour, but it is augmented in a semi-cloak of the mystic. 

She was a ton of fun to convert, a challenge to paint, and I have photographed her fully three times, once and most recently after gluing her back together after a nightmare drop in which she severed her thigh and came off her base!

I truly can't stress enough how much fun the Yedharo minis line is. They do fantastic Orcs, have expanded to a full and beautiful line of dwarves, and are adding demons (though not nearly enough!) Expect to see more of theirs on this blog eventually and grab what you can of theirs!